Getting into 3D printing for under $200 used to mean risking a frustrating, half-assembled machine that spends more time clogged than creating. The good news is that the sub-$200 market has matured fast, now offering genuinely capable printers that a beginner can unbox and start printing from within minutes, not hours. This guide cuts through the hype to help you pick the machine that fits your space, your skill level, and the kind of stuff you actually want to make.
I’m Min — the co-founder and writer behind Gadgets Feed. This guide is built by comparing the manufacturers’ published specifications and the patterns across verified customer reviews, so you get each pick’s real strengths and trade-offs instead of marketing spin.
Whether you are a parent looking for a creative STEM toy or a hobbyist chasing your first resin miniatures, real value here comes from knowing which specs matter and which brands deliver reliable hardware without hidden costs. That is exactly what this review of the best 3d printer under $200 is designed to help you figure out.
How To Choose The Best 3D Printer Under $200
Three things matter most in this price range: how much time you need to spend before the first successful print, what you plan to make, and whether the company supports the machine when things go wrong. Here is a quick breakdown of the features you will see on every box.
FDM vs. Resin: Which Technology Fits You?
FDM printers (the ones that melt a spool of plastic filament, like a hot glue gun on a robot arm) are the most common under $200. They are simpler, use safer materials, and are generally better for functional parts like toys, brackets, or prototypes. Resin printers use a tank of liquid resin and a UV screen to cure layers, producing much finer detail — perfect for miniatures, jewelry, or action figures. The catch is messier cleanup and the need for ventilation and safety gear (gloves, isopropyl alcohol).
The Auto-Leveling Advantage
Manual bed leveling — adjusting the distance between the nozzle and the print surface by turning screws — is the single biggest headache for new users. Machines with auto-leveling (a sensor that measures and adjusts the bed automatically) are considerably less frustrating out of the box. For under $200, auto-leveling is a feature worth prioritizing over a larger build volume or a slightly higher resolution.
Build Volume and Resolution: Read the Numbers
Build volume (the maximum size an object can be printed) is listed in millimeters or inches. A printer with a 100mm cube build volume is fine for smaller objects like keychains and minis, but you cannot print a helmet or a large vase on it. Resolution in FDM machines is determined by the nozzle size (standard 0.4mm) and layer height, while resin machines are described by their screen resolution in pixels and XY pixel size in microns — smaller numbers mean finer detail.
Quick Comparison
On smaller screens, swipe sideways to see the full table.
| Model | Category | Best For | Key Spec | Amazon |
|---|---|---|---|---|
| Creality Resin 3D Printer HALOT R6 | Resin | Newbies wanting high detail out of the box | 2K 6.08-inch LCD / 4.25 kg weight | Amazon |
| Fully Assembled Mini 3D Printer TINA2S | FDM | Kids and total beginners | Auto-leveling / 6.4 lbs weight | Amazon |
| Entina Mini Tina2 Basic | FDM | Quick first print in minutes | Auto-leveling / 6 lbs weight | Amazon |
| ANYCUBIC Photon Mono 4 | Resin | Detail-hungry model makers | 7” 10K LCD / 17×17μm pixels | Amazon |
| Entina Tina2C | FDM | App-driven creation and STEM learning | WiFi & App / 8.16 lbs weight | Amazon |
| Creality Ender 3 | FDM | Tinkerers who enjoy upgrading | 8.66×8.66×9.84 in build volume | Amazon |
| ELEGOO Mars 5 | Resin | Miniature painters and cosplay makers | 6.6-inch 4K Mono / 19.11 lbs | Amazon |
| Creality SPARKX i7 | FDM | Speed and multicolor printing | 260mm³ build volume / 500mm/s speed | Amazon |
In‑Depth Reviews
1. Creality Resin 3D Printer HALOT R6

The Creality HALOT R6 wins the top spot because it gives you resin-level detail (think smooth miniatures with no layer lines) for a price that often buys only FDM — and it comes fully assembled so you skip the two-hour build. The printer includes a built-in boot guide that walks you through the first setup, making it genuinely accessible to someone who has never touched a 3D printer before.
The standout feature is the integral light source — the same kind usually found in much more expensive printers — with a light uniformity of over 90%, which means each layer cures evenly so your models end up smoother and more consistent. The orange-coated top cover blocks 99.89% of UV rays, so the resin inside stays usable longer and the environment is safer for your eyes. Weighing in at 12.72 pounds on a 16.1 x 15.4 x 18.7 inch frame, it is noticeably heavier than the Entina Tina2 Basic, but that heft translates to the sturdy, vibration-free build buyers report produces cleaner prints.
The honest catch is that it requires the full resin workflow — gloves, isopropyl alcohol, and a curing station — that one reviewer mentions as “essential accessories” you do not get in the box. The 2K resolution is lower than the ANYCUBIC Photon Mono 4’s 10K screen, so if your main goal is ultra-fine detail on tiny figurines, you might prefer the Photon Mono 4. For most people wanting a single, easy-to-start resin printer under $200, the HALOT R6 is the best value.
Why it’s great
- Genuinely newbie-friendly with on-screen boot guide
- High-end integral light source for consistent, smooth prints
- Compact and sturdy at 12.72 lbs
Good to know
- Requires separate resin handling gear (gloves, IPA, curing box)
- 2K resolution is lower than the Photon Mono 4’s 10K screen
2. Fully Assembled Mini 3D Printer TINA2S

Compared to the top pick Creality HALOT R6, the TINA2S is about half the weight at 6.4 pounds with dimensions of 8.3 x 8.3 x 11.4 inches, making it far easier to move between a desk and a shelf. You do not need to learn any safety procedure with the TINA2S — it is an FDM printer that uses a simple spool of 1.75mm PLA filament, safe enough for a child’s bedroom.
The biggest confidence booster for new users is the auto-leveling bed and the magnetic flexible build plate — owners mention that “Out-of-box Benchy print good” meaning the classic test boat printed perfectly on the first try with zero tinkering. The printer also supports WiFi printing and works with slicers like Cura and Simplify3D, so you are not locked into proprietary software. One parent wrote that their 11 and 12 year old boys “have a blast with it” using the app on tablets.
The downside is a smaller build volume and a 0.2mm layer height that limits ultra-fine detail, which is fine for toys and trinkets but not for miniature figurines. If you want a machine that is truly ready in under 10 minutes with minimal supervision, choose this over the HALOT R6 — this printer is for the family that wants zero mess and zero hazards.
Where it shines
- Fully assembled with auto-leveling and magnetic bed
- WiFi and app printing for tablet and phone control
- Lightweight and compact at 6.4 lbs
Worth noting
- Small print volume limits larger projects
- Some reviewers report adhesion issues without the included glue stick
3. Entina Mini Tina2 Basic

If the most important thing is getting a print done immediately, the Entina Tina2 Basic is the one to beat. The company claims “you can start the first print 5 minutes!” — and multiple reviewers confirm the machine arrives fully assembled with a MicroSD card of test models ready to go. That is faster than the TINA2S or the HALOT R6 in total time-to-first-print.
At 6 pounds, it is even lighter than the TINA2S, and its dual Z-axis rails help keep the print head stable for precise layers. The auto-leveling works well enough that a 10-year-old who received it as a gift has been “using every day since he got it” without needing adult help. It uses a simple knob interface to load and unload filament, keeping the experience low-tech and independent.
The build volume of 100 x 105 x 100mm is small — you are making trinkets, fidget toys, keychains, and very small parts. That is not a flaw if your goal is to test the waters of 3D printing with a kid, but it is a dealbreaker for anyone hoping to print larger functional pieces. The Tina2 Basic is the ideal starter FDM machine for a household with children who want to see something pop out fast.
What stands out
- Start the first print in minutes out of the box
- Dual Z-axis rails for stable, precise printing
- Safe and simple enough for a 9-year-old to use independently
The trade-offs
- Very small build volume limits project size
- Basic knob interface compared to app-based controls on the Tina2C
4. ANYCUBIC Photon Mono 4

The single most impressive spec in this entire sub-$200 roundup is the Photon Mono 4’s 7-inch monochrome LCD screen with a 9024×5120 resolution and 17×17 micrometer pixels on the X and Y axes. If you are printing miniatures with tiny lettering or logos, this level of detail is the difference between a blurry blob and a meticulously sharp model — far sharper than the Creality HALOT R6’s 2K screen can manage.
The trade-off you accept is the standard resin workflow mess: you need gloves, isopropyl alcohol, and a separate curing station, and one reviewer notes that the “FEP is non-compatible proprietary unit” meaning the release film in the resin vat is a custom part that costs more to replace. The laser-engraved build platform helps with adhesion, and the 4-point leveling system is genuinely beginner-friendly, but the smaller print volume (6.04 x 3.42 x 6.49 inches) means you are not printing large objects.
For the price, getting a 10K monochrome screen with LighTurbo matrix lighting that minimizes layer lines is exceptional value. If detailed model making is your primary interest, this is the best performance per dollar on the list.
The upsides
- Incredible 10K resolution for ultra-fine detail on miniatures
- Fast 70mm/h print speed
- Laser-engraved platform for strong adhesion
Keep in mind
- Needs resin handling safety gear and separate curing
- Proprietary FEP film is expensive to replace
5. Entina Tina2C
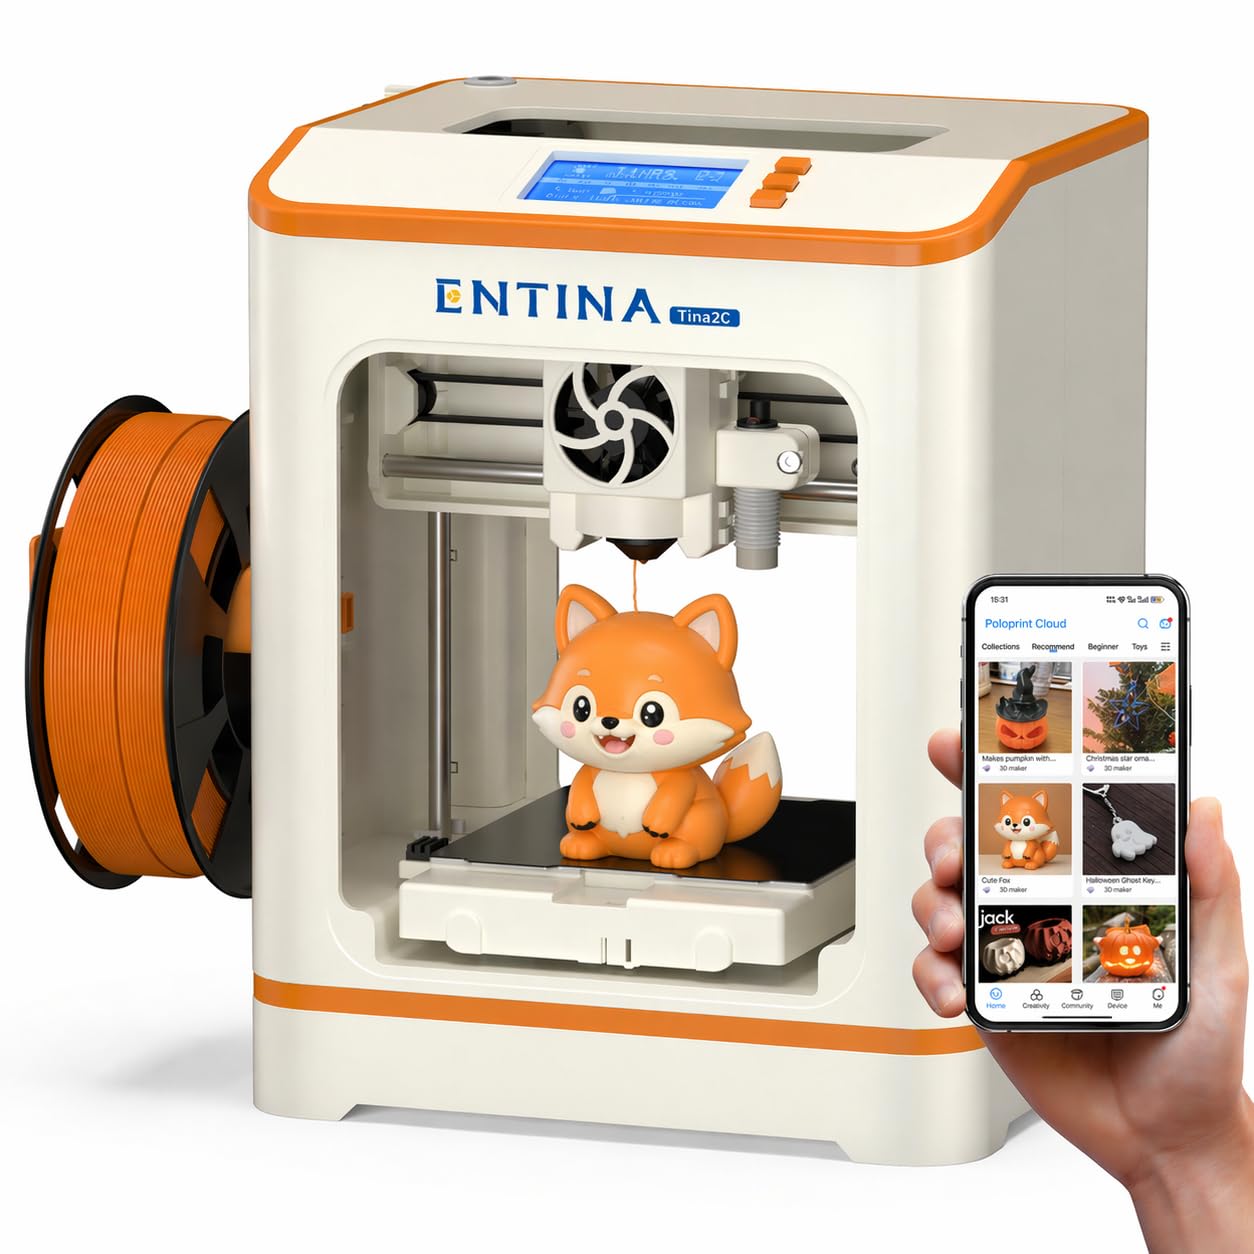
At a higher tier in the value range, the Tina2C gives you the same family-friendly auto-leveling FDM experience as its sibling the Tina2 Basic, but adds a significant layer of smarts: full WiFi control through the Poloprint Cloud app, AI-powered photo-to-print conversion, and a library of over 3000 models and 20 creative STEM modules.
The guided setup through the app claims you can have your first print in 8 minutes, which is consistent with what reviewers report — one user wrote that a 9-year-old “has not stopped creating toys and fidgets” since receiving it. The self-cleaning nozzle and quick-swap printhead make maintenance less intimidating for families, and the low-noise operation with an integrated LED light makes it desk-friendly.
The build volume is a tight 3.9 x 3.9 x 3.9 inch cube, so it is strictly for small objects. If you want a printer that connects directly to a tablet or phone and integrates STEM learning content, the Tina2C is a smarter pick than the simpler Tina2 Basic, but you pay for that app ecosystem. This is the one for the family that wants educational content built in — but if you just want the fastest possible first print, the cheaper Tina2 Basic is a better value.
Why we’d pick it
- WiFi and app-based printing from phone or tablet
- 3000+ model library and STEM learning modules
- Self-cleaning nozzle and quick-swap printhead
A few caveats
- Smaller build volume than the TINA2S
- Requires 2.4GHz WiFi for app connectivity
6. Creality Ender 3

This pick is perfect for the tinkerer or hobbyist who genuinely enjoys assembling and modifying hardware, rather than someone who just wants to start printing immediately.
The Ender 3 offers a larger build volume of 8.66 x 8.66 x 9.84 inches — enough for objects like a helmet or fan shroud — but arrives as a kit requiring about two hours of careful assembly, with reviewers universally warning that the printed manual is poor and that YouTube tutorials are a better guide. Its massive open-source community has created thousands of mods, from an auto-leveling BLTouch sensor to a glass bed upgrade to all-metal hotends; one reviewer who spent a year with it calls the machine “only for endless tweaking,” noting that cheap stock parts will eventually need replacement, while another calls it a “cheap printer with great performance after assembly” but says upgrades are almost mandatory for consistent results.
However, be cautious: if you want to print right away, the TINA2S or SPARKX i7 will get you there faster, as the Ender 3’s stock parts and assembly demands mean it is not a ready-to-run machine.
Strong points
- Largest FDM build volume under $200
- Massive community with thousands of upgrades available
- Resume printing function for power outages
Before you buy
- Requires 2+ hours of assembly and manual bed leveling
- Stock build plate and hotend often need upgrades
7. ELEGOO Mars 5

The ELEGOO Mars 5 splits the difference between the entry-level Creality HALOT R6 and the high-resolution Photon Mono 4. It packs a 6.6-inch 4K monochrome screen with 4098×2560 pixel resolution and a COB (Chip on Board) light source that achieves 92% light uniformity, which is solid for printing DnD and Warhammer miniatures with good detail.
What the Mars 5 does that neither of those two does is intelligent mechanical sensing: it detects low resin, foreign objects in the vat, release film damage, and overheating, and runs a self-check before starting a print. That is a meaningful safety net for someone nervous about ruining a print or damaging the machine. Customers note excellent packaging and a compact build, but mention that the Chitubox slicer has a noticeable learning curve and that the machine struggles with light supports for small objects.
At 19.11 pounds, the Mars 5 is the heaviest printer in this lineup by a wide margin — it weighs over three times as much as the Tina2 Basic — so it is not easily portable, but that weight plus copper tube cooling fans means it runs stable and cool during long prints. It is a confident mid-range resin pick for detail-oriented hobbyists who want safety features. Buy this one if you like the HALOT R6’s simplicity but want a higher 4K resolution and that extra protection against failed prints.
What we like
- Intelligent mechanical sensor detects low resin and overheating
- COB light source with 92% uniformity for smooth surfaces
- Strong cooling system for reliable long prints
The downsides
- Very heavy at 19.11 lbs — not for moving around
- Chitubox slicer has a learning curve for supports
8. Creality SPARKX i7
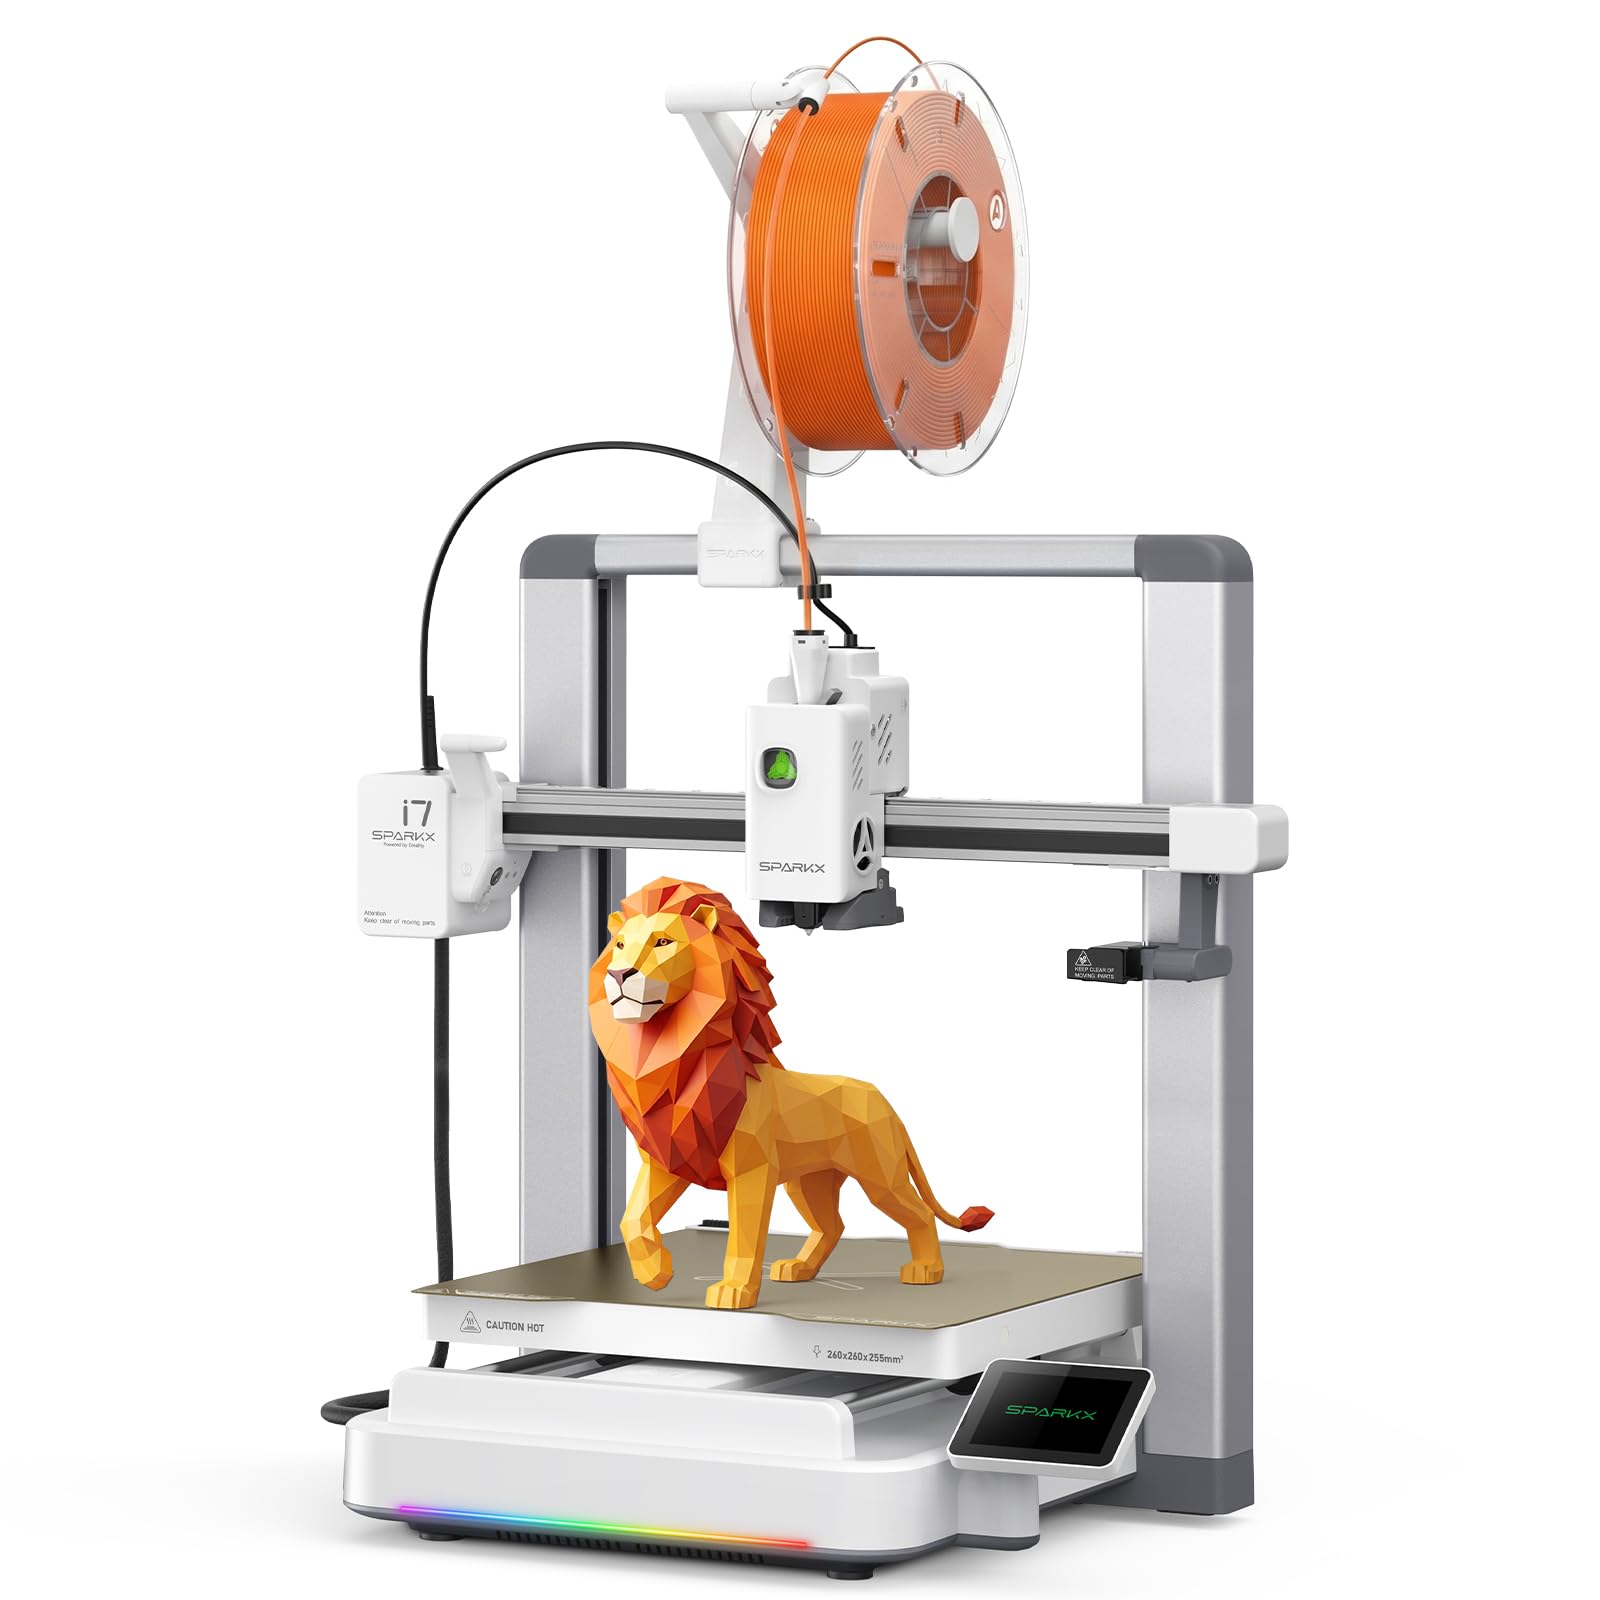
500mm/s print speed and multicolor capability make the Creality SPARKX i7 the top pick for the speed-hungry maker who wants to print large parts like helmets in record time. It is the newest machine on the list and the most technologically ambitious, pushing the boundaries of what a sub-$200 printer can do, dramatically faster than the standard 50-60mm/s of the Ender 3 or the Tina2 printers.
At this price, you get an AI camera that detects print failures like spaghetti strings and filament tangles in real time and sends alerts to your phone, automatic bed leveling, input shaping that cancels out vibrations for cleaner surfaces, and a large 260 x 260 x 255mm build volume that rivals the Ender 3. The RGB light bar and Night Mode for quiet operation are nice cosmetic touches, but the real draw is the speed and the AI-assisted calibration that means almost zero setup. One reviewer noted the printer is “solid” and prints functional parts out of the box, but noted that the top panel can cause the extruder cable to hit the edge, requiring a simple riser.
If you want the fastest possible prints and the largest build volume in this price bracket, and you are willing to accept that the software and firmware are still being refined by the community, the SPARKX i7 offers value that beats most of the field hands-down for sheer capability. This is for the speed-hungry maker who wants to print helmets and large parts in record time — not for the beginner who just wants simple toys, where the TINA2S is cheaper and easier.
Why it’s great
- Ultra-fast 500mm/s print speed with input shaping
- AI camera for real-time print failure detection and alerts
- Large 260mm³ build volume at a budget price
Good to know
- Multicolor printing requires separate CFS accessory
- Some early reports of top panel clearance issues with the extruder cable
Understanding the Specs
Build Volume
Build volume is the maximum size of an object you can print in one go, measured in millimeters or inches. A printer with a 100mm cube build volume (like the Entina Tina2 Basic) is fine for small trinkets, keychains, and fidget toys. If you want to print a helmet, a vase, or a larger mechanical part, you need something like the Creality Ender 3 (8.66 x 8.66 x 9.84 inches) or the SPARKX i7 (260mm cube).
Resolution (Layer Height & Pixel Size)
For FDM printers, resolution is expressed as layer height — typically 0.1mm to 0.3mm. Smaller numbers mean smoother surfaces. For resin printers, resolution is the screen’s pixel count and XY pixel size in micrometers (µm). The ANYCUBIC Photon Mono 4 has 17×17µm pixels, meaning each tiny square of UV light is only 17 microns wide — this produces incredibly sharp, detailed miniatures with no visible layer lines.
Auto-Leveling vs. Manual Leveling
Auto-leveling uses a sensor to measure and adjust the height of the print bed automatically before every print. Manual leveling requires you to turn four screws under the bed while sliding a piece of paper between the nozzle and the bed to feel the correct gap. For beginners under $200, auto-leveling is the feature that separates a great first experience from a frustrating one. The Ender 3 is the only printer here that requires manual leveling.
Print Speed
Print speed is how fast the print head moves while extruding plastic, measured in millimeters per second (mm/s). Typical consumer FDM printers run at 50-60mm/s. The Creality SPARKX i7 claims 500mm/s — nearly 10x faster — but that speed comes with trade-offs like potential ringing or vibration artifacts unless the printer has input shaping (which the SPARKX i7 does). For beginners, speed is less important than reliability. It is better to wait a few extra hours for a successful print than to have a fast print fail halfway.
FAQ
Is a resin printer under $200 safe for a child to use?
What is the real cost of ownership for a 3D printer under $200?
How big of an object can I actually print with these printers?
Final Thoughts: The Verdict
For the majority of shoppers, the best 3d printer under $200 winner is the Creality HALOT R6 because it delivers resin-quality detail and a genuinely beginner-friendly setup at a price that undercuts most rivals. If you want a simple, safe FDM machine for the family with no hazards and instant printing, grab the Fully Assembled Mini 3D Printer TINA2S. And for speed and the largest build volume packed with AI features, the Creality SPARKX i7 is the most capable, feature-rich machine under $200 available now.