If you noticed that your Apple Watch battery is running down faster than usual after updating to watchOS 11, you’re not alone.
While this update introduces exciting new features like enhanced health and fitness tools and more customization options for your watch face, some users have experienced increased battery drain.
If you are facing these issues, don’t worry—there are practical steps you can take to help extend your Apple Watch’s battery life.
I have gathered 15 effective settings adjustments to help you get the most out of your device and keep it running smoothly throughout the day.
Understanding Apple Watch Battery Drain
Before going to the solution it’s important to understand the common causes of battery drain and how to maintain battery health.
Common Causes of Battery Drain
There are several reasons why your Apple Watch battery may be draining quickly. Here are some common causes:
- Using Third Party Software Using Using Third Party Software on your iPhone and Apple Watch can cause the battery drain issue as mostly they are not updated with the latest version of IOS and WatchOS
- Background App Refresh: Some apps refresh in the background, which can drain your battery. You can turn off this feature for specific apps in the Watch app on your iPhone.
- Bluetooth: If your iPhone and Apple Watch are not nearby, your watch will use more battery to maintain a Bluetooth connection.
- Notifications: Receiving frequent notifications on your watch can also drain the battery. Consider turning off notifications for apps that are not essential.
Battery Health and Lifespan
The battery in your Apple Watch has a limited lifespan and will eventually need to be replaced. However, there are steps you can take to maintain battery health and prolong its lifespan:
- Software Updates: Keeping your watch up to date with the latest software updates can improve battery performance.
- Reduce Usage: Limit your usage of battery-intensive features, such as location services and workouts, to conserve battery life.
- Power Reserve Mode: If your battery is critically low, you can enable Power Reserve mode to extend the battery life for a few hours.
- Charge Regularly: Charge your watch regularly to maintain battery health. Apple recommends charging your watch every night.
By understanding the common causes of battery drain and taking steps to maintain battery health, you can extend the lifespan of your Apple Watch battery and avoid frustrating battery drain issues.
Initial Troubleshooting Steps to Apple Watch Battery Drain Issue
Some initial troubleshooting steps you can take before changing other settings on your Apple watch.
Check for Software Updates
The watch battery issues are usually because of the update so you might be running an old WatchOS Before doing anything else, make sure that your Apple Watch is running the latest version of watchOS.
To check for updates, follow these steps You can also follow the the same steps on Watch as the interface is the same.
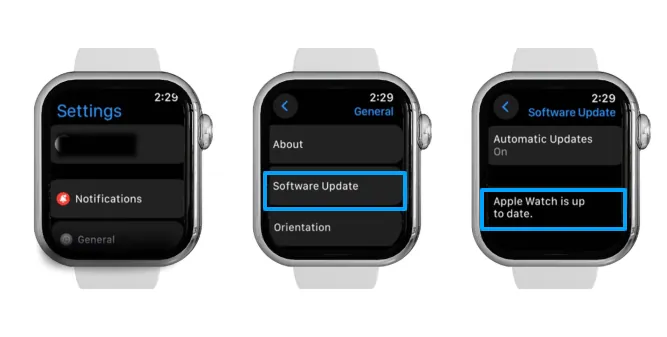
- Open the Watch app on your iPhone
- Tap on the “My Watch” tab.
- Tap on “General”.
- Tap on “Software Update”.
- If an update is available, tap on “Download and Install”.
Keep your Apple Watch near your iPhone during the update process and ensure both devices are connected to Wi-Fi and have enough battery life.
Unpair and Pair it Again
The Unpairing and Pairing apple watch is the most effective troubleshooting step and will solve any software glitch so follow the steps below:
Unpair your Apple Watch:
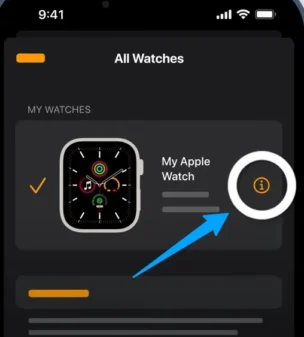
- Open the Watch App on your iPhone and go to the My Watch tab.
- Select All Watches at the top.
- Choose your Watch from the list and tap on (i).
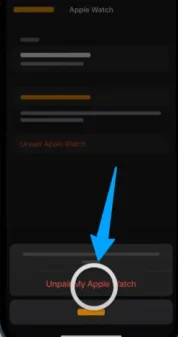
- Tap on ‘Unpair Apple Watch’ and then tap again to confirm.
Once done wait for it might take a few second to unpair and then follow the steps below.
Pair Your Apple Watch Again:
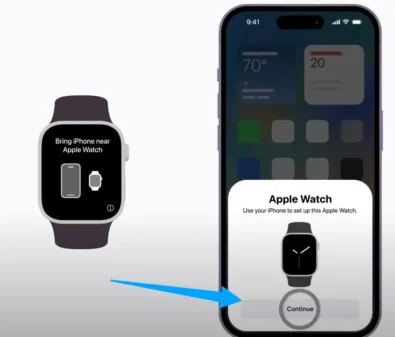
- Before pairing, make sure Bluetooth is on and your iPhone is connected to Wi-Fi. Also, turn off your Watch after unpairing.
- Press and hold the side button on your Apple Watch to turn it on.
- Bring it close to your iPhone. you will see a message on your iPhone, tap on ‘Continue’.
- Tap on ‘Set Up for Myself’.
- Use your iPhone’s camera to scan the Apple watch screen.

Your Apple Watch is now paired. Just follow the on-screen instructions to finish setting it up.
Restart Your Apple Watch
Restarting your Apple Watch can help fix minor software issues that may be causing battery drain. To restart your Apple Watch, follow these steps:
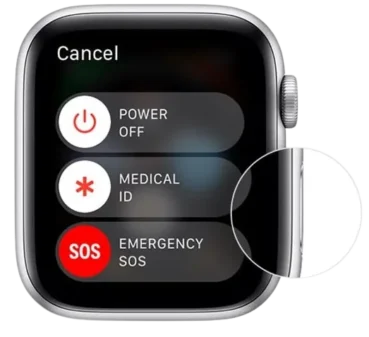
- Press and hold the side button until the Power Off slider appears.
- Drag the slider to the right to turn off your Apple Watch.
- Press and hold the side button again until the Apple logo appears.
Inspect Battery Usage
If your Apple Watch battery is draining quickly, it’s important to identify which apps or features are using the most battery. To inspect battery usage, follow these steps:
- Open the Watch app on your iPhone.
- Tap on the “My Watch” tab.
- Tap on “Battery”.
- Check the “Last 24 Hours” and “Last 7 Days” sections to see which apps or features are using the most battery.
If you notice that a particular app or feature is using a lot of battery, try using it less frequently or uninstalling it altogether.
1) Use Simple Watch Face Complication
A complex Apple Watch Face Complication will use more battery then a simple one so if you are using a complex watch complication switch to simple one and it will save you so much battery
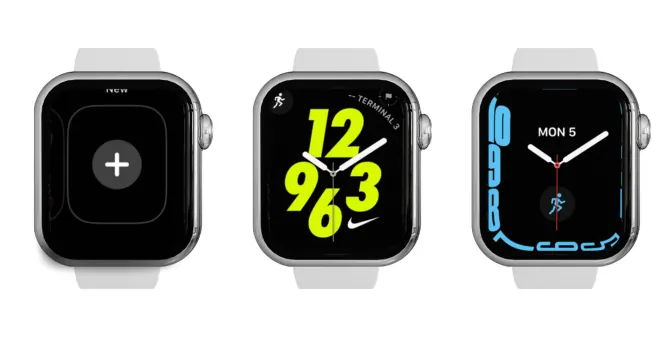
Here how to to do it:
- Open the Watch app on your iPhone.
- Browse through the available watch faces.
- Choose a watch face with fewer complications to save battery life.
- If you prefer a face with complications, consider removing some by tapping ‘Edit’ on the watch face.
2) Keep the Display and Brightness at Midway Point
Keeping the brightness at the midway point will help you in battery conversation and will give you balanced visibility.
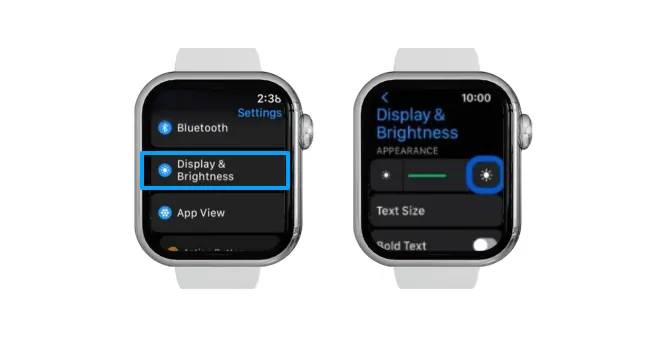
- In the Watch app, scroll to ‘Display and Brightness.’
- Locate the brightness slider at the top of the screen.
- Adjust the slider to the midpoint for optimal balance between visibility and battery life.
- Trust the auto-brightness feature to adjust the screen brightness based on ambient lighting conditions.
3) Adjust Always ON Display Setting
Always On Display is only going to apply to the Apple Watch series 9,8,7,6,5 also if you have Apple Watch SE this part won’t apply to you.
So Let see how you can adjust Always ON display setting to save battery
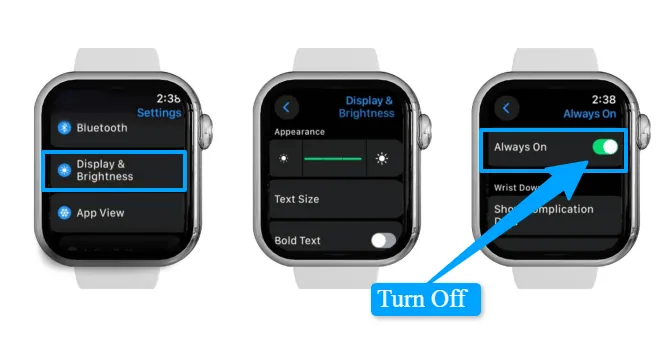
- Open the Watch app on your iPhone.
- Scroll down and select ‘Display & Brightness.’
- Find the ‘Always On’ option.
- Toggle ‘Always On’ off to save a significant amount of battery life.
Remember, these settings are about personal preference. If you value the Always On Display, you might choose to keep it on despite the battery usage. It’s all about finding the right balance for your needs.
4) Wake On Wrist Raise
Wake on Wrist Raise What this means is, if you turn your wrist, will your screen automatically wake up—yes or no? Or will it require you to tap the display or press the side button?
From a convenience perspective, having this feature ON is nice, especially if you have the ‘Always On Display’ turned off.
However, if you have the ‘Always On Display’ on, you don’t need ‘Wake on Wrist Raise’ as the screen will be visible to you. So, this is a good opportunity to save some battery life.
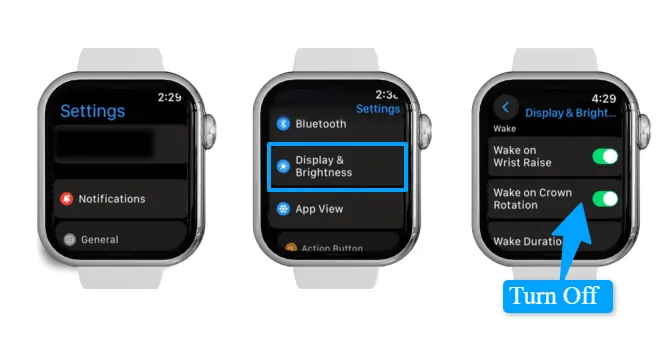
So to turn off wake on the wrist you have to to go to Settings > Display & Brightness > Turn Off Wake On Wrist Raise
5) Set Wake Duration to 15 Second
Below the wake on Wrist option you will see The Wake Duration setting it controls how long your Apple Watch screen stays on before it automatically turns off.
While some may need 70 seconds, I find that excessive for just checking the time. Therefore, I will adjust this setting down to 5 seconds.
6) Disable “Hey Siri” Option
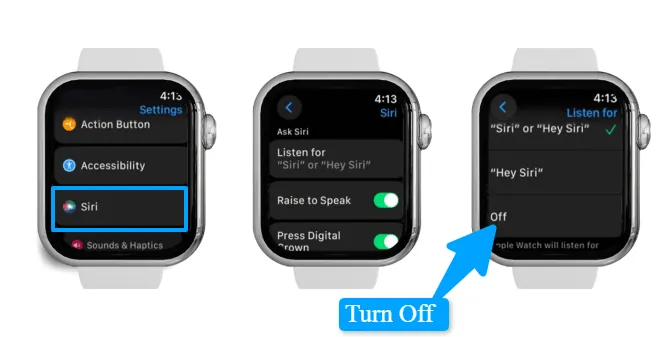
Siri on the Apple Watch is one of my favorite features but the way you use Siri can significantly affect your battery life.
On the main page of the Watch app, scroll down to find Siri. By default, the ‘Listen for’ setting will be on so you should turn this off.
Keeping this feature on means your watch is constantly listening for these activation phrases through the microphones, which significantly drains the battery.
Instead, turn it off and use the Digital Crown to activate Siri. Simply press and hold the Apple watch button (Digital Crown), Siri will be activated.
So, all you need to do is press and hold the Digital Crown. It’s not much extra effort, but trust me, it saves a lot of battery life without impacting Siri’s functionality.
7) Turn Off Background App Refresh
Controlling Background App Refresh can help save your Apple Watch battery. It’s like on your iPhone, where apps look for new stuff even when you’re not using them. But this searching uses up battery.
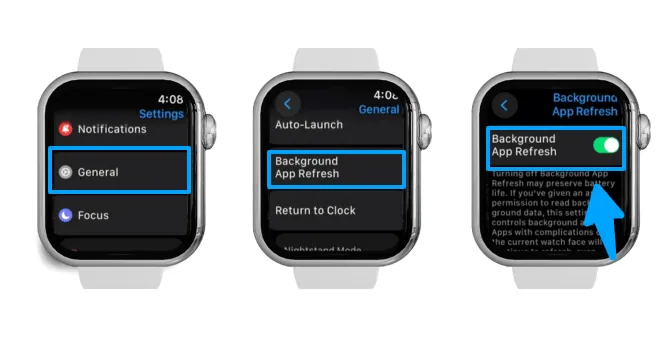
To control it, go to Settings > General > Background App Refresh on your Apple Watch. There you can turn it off completely or for certain apps.
8) Adjust the Haptic Vibrations
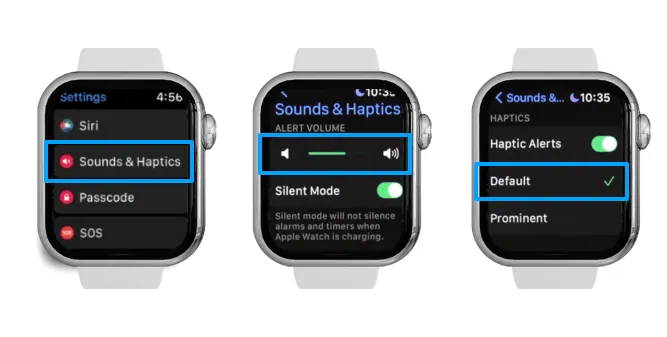
Sound and haptics are key areas where you can optimize your Apple Watch. So first go to your Apple Watch settings scroll down to click on “Sound and Haptic“
Starting with notification volume as the watch is always on your wrist, a loud setting isn’t necessary.
I recommend turning the volume down, or even muting it completely, as I often do. A lower volume means the speaker activates less frequently and at a lower intensity, conserving battery life over time, especially with numerous daily notifications.
For notifications, I prefer to feel them through the haptic feedback on my wrist, a feature where the Apple Watch excels over other smartwatches.
There are two haptic options: the default and Prominent. Prominent haptics are more intense, noticeable even under layers of clothing or during a workout but will consume more power so I will prefer the default one.
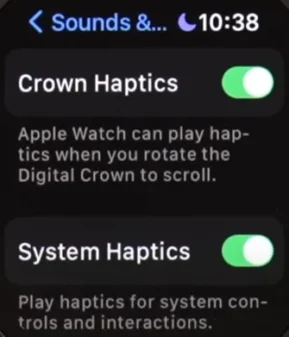
Also if you scroll down further you will see a crown Haptic and system haptic which I like but if you want to disable it you can do that to save more battery life.
9) Reduce Notifications
Adjusting your notification settings is not only beneficial for conserving battery life but also for reducing distractions and enhancing mental well-being.
It’s essential to limit the number of notifications you receive on your watch throughout the day.
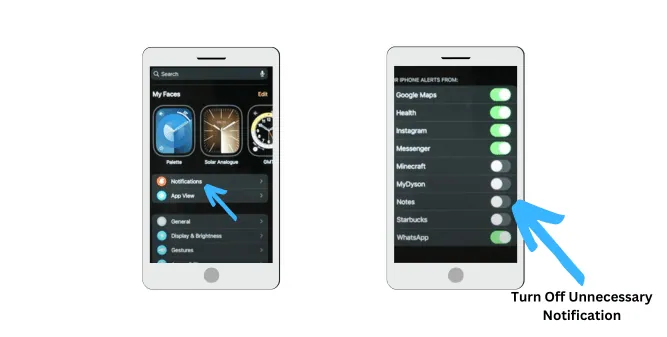
To optimize this, navigate to the notification settings on the homepage of the Watch app. You will notice two sections: one for Apple apps installed on the watch and another for apps mirrored from your iPhone.
By default, all notifications are enabled. My advice is to deactivate most of them, particularly for streaming, gaming, and shopping apps, which aren’t critical.
However, keep notifications active for essential apps like messages, banking, or maps. This way, when your watch alerts you, it’s for something significant.
Reducing the frequency of alerts means less activation of the speaker and haptic motor, which, over time, leads to considerable battery savings.
So, this approach is not just good for your battery life but also for your overall well-being
10) Make Use of Do Not Disturb
An excellent, yet often overlooked feature of the Apple Watch, is the Do Not Disturb mode. Once activated, it allows the watch to silently receive notifications, without alerting the user until they choose to disable the feature.
This proves especially beneficial when one needs to focus on a task without interruptions, and it also aids in conserving battery life.
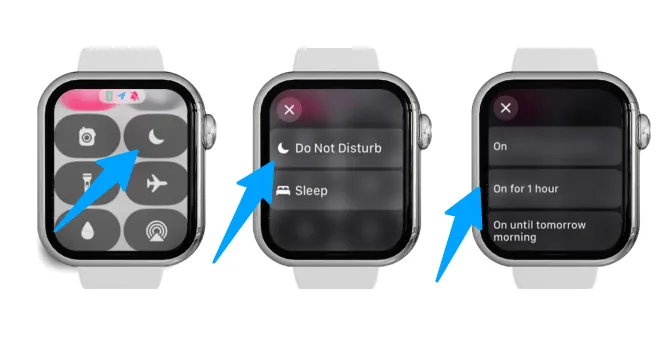
To enable Do Not Disturb, simply access the Control Center on your Apple Watch. Look for the icon represented by a crescent moon, which is the Do Not Disturb symbol.
Beyond merely turning on the feature, you have the choice to set it for an hour or keep it on until the following morning, or even use a location-based option that automatically activates Do Not Disturb when you leave your current location.
11) Turn Off Activity Reminders
I believe the Apple Watch is excellent for keeping you active by tracking your activities, steps, workouts, etc. However, by default, you receive numerous notifications, particularly from the activity app.
These include daily coaching, goal completions, and special challenges. While some may find this helpful, I prefer to monitor the Rings.
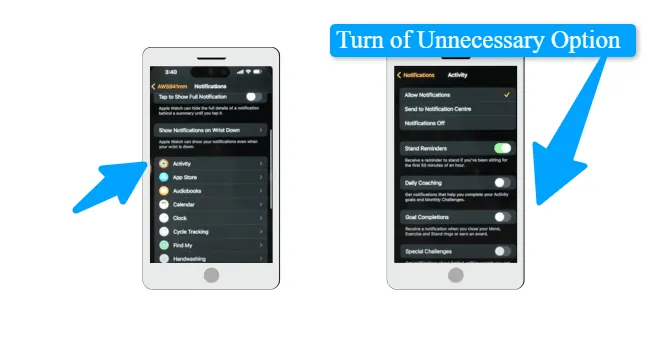
To switch them off, open the Apple Watch app. Then go to the “My Watch” tab and choose “Notifications,” followed by “Activity.” From there, you can pick which notifications you want to turn off.
I do appreciate the stand reminders, especially since I spend many hours sitting at my computer working and writing these helpful guides for you guys.
The stand reminder is beneficial, but I turn off all other notifications. I recommend you do the same; it will not only save battery life but also reduce interruptions.
12) Turn Off Heart Rate Monitor
One of the Apple Watch’s standout features is its continuous heart rate monitoring, day and night.
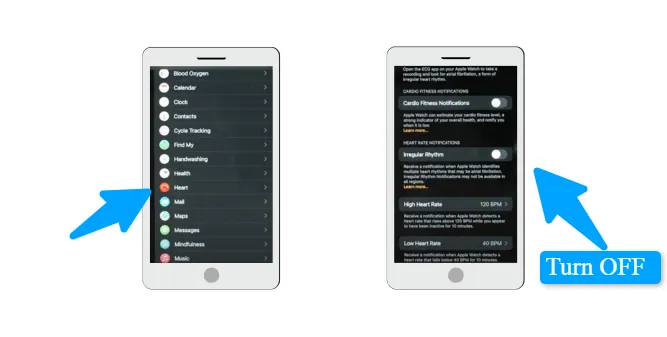
However, the setup significantly affects battery life. so on the watch app main page, scroll to the ‘Heart’ section, and there you will find options to toggle specific notifications.
You have alerts for general cardio fitness and heart health, including irregular rhythm notifications.
You can set thresholds so that if your heart rate exceeds or falls below a certain level, you will be notified.
For those with heart conditions, it’s advisable to keep all these features active. They provide valuable data that you can share with your doctor or monitor on your phone.
But if you are free from heart concerns, consider disabling most of these alerts. This won’t stop your Apple Watch from tracking your heart rate; it will continue to do so, but less frequently and typically every 10 to 15 minutes while wearing it.
In the Health app on your iPhone or directly on your watch, you can still view the graphs showing your heart rate variations throughout the day or during workouts, which I find quite insightful.
By adjusting these settings, you won’t be bombarded with notifications all day, and the watch will check your heart rate less often, conserving battery life while still providing you with essential data. In my view, this strikes the perfect balance.
13) Disable Walkie Talkie
The Walkie-Talkie function allows for quick communication with other Apple Watch users, which can be handy if you have several family members who also use an Apple Watch and prefer not to call or text them.
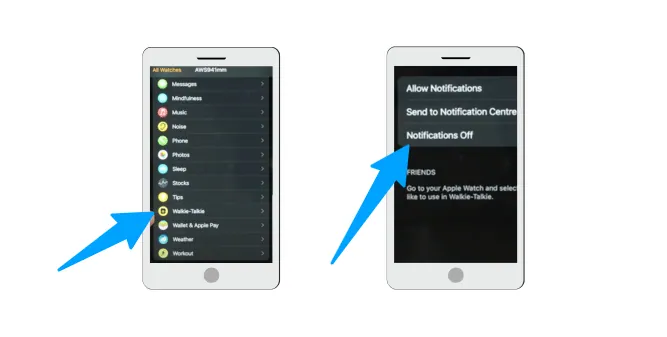
To disable Walkie-Talkie, scroll down in the Apple Watch settings until you find ‘Walkie-Talkie’ and disable it
Personally, I have never used it. It’s enabled by default, also turning off notifications will also deactivate the feature.
This prevents your Apple Watch from searching for other watches in the vicinity or on your network with this feature turned on. In my experience, disabling it saves battery life without sacrificing a significant feature.
14) Activate Low Power Mode
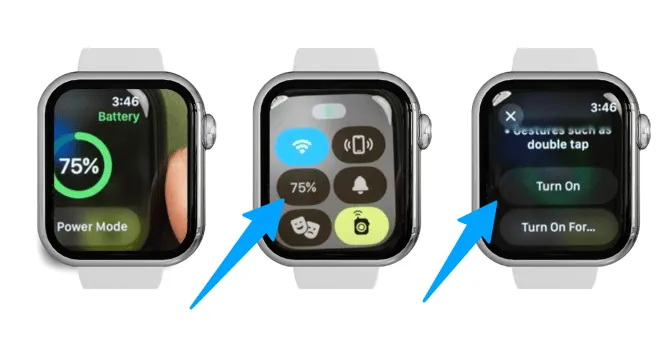
The next setting we have is to activate Low Power Mode. If you are unfamiliar with this process, simply press the side button on your Apple watch, tap on the battery percentage, and then select ‘Activate Low Power Mode’.
This feature is one I recommend using only if necessary.
According to Apple, activating it can double your battery life from an estimated 18 hours to 36 hours.
However, it significantly reduces the functionality of your watch by disabling many of its smart features.
As you scroll through the options, you will notice it turns off numerous capabilities that contribute to the Apple Watch’s appeal.
Therefore, unless you are in a situation where you need to conserve power yet still wish to check the time, consider using this mode only temporarily.
My advice is to tailor these settings to optimize the features we have discussed. Depending on your configuration, this can already help save a substantial amount of battery life potentially doubling it or more.
It’s all about enabling the features you use and disabling those you don’t need.
15) Turn ON Optimized Charging
I highly recommend enabling Optimized Charging on your Apple Watch.
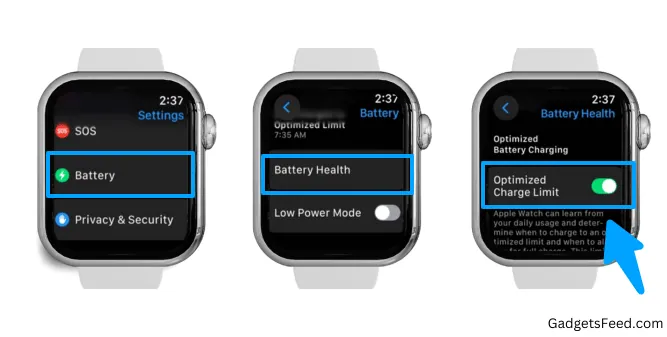
To do this, open the Settings app on your watch, scroll down to the ‘Battery’ section, and then proceed a bit further to ‘Battery Health’.
Here, you will find the ‘Optimized Battery Charging’ option. Turning this on is beneficial not only for your Apple Watch but also for your iPhone.
This feature learns your charging patterns for example, if you typically charge your watch overnight. It will charge the battery to 80% and then pause, completing the remaining 20% closer to the time you usually disconnect your watch in the morning.
This intelligent charging method extends your battery’s lifespan, ensuring it lasts longer and maintains a higher capacity, which translates to more available battery life over time.
Some Additional Tips
1) Temporarily Turn Off Memories Sync
Temporarily disabling the Memories sync feature might help to reduce the battery drain after the watchos11 update
This setting prevents your Apple Watch from syncing featured photos, memories, or selected albums from your iPhone, which can reduce background activity and save battery. Here’s how you can turn it off:
- Open the Apple Watch app on your iPhone.
- Tap My Watch, then tap Photos.
- Toggle off Photo Syncing to stop your Apple Watch from syncing memories and featured photos.
This simple tweak can minimize battery consumption while allowing your Apple Watch to function efficiently.
2) Temporarily Disable Live Activities
Live Activities on your Apple Watch can be useful for staying updated in real time, but they can also drain your battery.
If you’re experiencing battery drain after updating to watchOS 11, try disabling Live Activities temporarily. Here’s how to do it:
- Press the Digital Crown once to access the apps screen.
- Open the Settings app.
- Scroll down and tap on Smart Stack
- Locate Live Activities and tap on it.
- You’ll see a list of all active Live Activities, such as alarms, media controls, and more.
- Toggle off Live Activities to disable them for all supported apps.
By disabling Live Activities, you can reduce background activity and extend your Apple Watch’s battery life until the next update or when you decide to turn the feature back on.
Conclusion
In conclusion, the key to extending your Apple Watch’s battery life lies in understanding the factors contributing to power consumption and taking control of your device’s settings.
You can significantly enhance its performance and longevity by fine-tuning features, optimizing how you use your watch, and ensuring the battery is maintained properly.
This guide has covered the most effective settings and adjustments you can make to not only improve battery life but potentially double it.
Remember, the goal is to find a balance that works for you by keeping the features that enhance your experience and disabling those that don’t.
With these 15 battery-saving tips, you can make smart choices that will allow you to enjoy a longer-lasting battery and a more seamless experience with your Apple Watch, ensuring that your investment continues to serve you well without compromising on functionality.

Hi, I’m Michael Davis, the owner and writer of GadgetsFeed.com. This website is where I share my knowledge and passion for tech, laptops, and computers. I’m a software engineer by profession, and I enjoy testing and reviewing various gadgets and technologies. I started GadgetsFeed.com to help others find easy solutions for their laptop, computer, and tech problems.
