I know you have probably read countless articles and watched multiple YouTube videos, but still haven’t found a solid solution for your iPhone keep restarting.
The issue can be so complex that without an organized troubleshooting guide, it’s hard to pinpoint the root cause.
I have done extensive research on this problem and I will share with you the most effective solutions to this issue.
But make sure to read through the entire guide carefully as I don’t want you to miss any crucial steps, as each solution is connected.
I will walk you through it step by step, and hopefully, one of these fixes will work for you.
However, keep in mind that this issue can be caused by faulty hardware, like a damaged flex cable for the charging port or sensors.
In that case, you will need to visit a repair shop or contact Apple for a fix.
First, let’s explore the reasons why your iPhone might be restarting, and then I will guide you through the step-by-step troubleshooting process.
Reasons Why Your iPhone Keeps Restarting
The most common reasons for older iPhones constantly restarting include a faulty battery, damage to the display panel’s ribbon, issues with the charging port flex cable, storage problems, failed updates, misbehaving apps, or corrupted system files, all of which can trigger a boot loop.
For the latest iPhone models, the issue is less likely to be battery-related. Instead, if your phone keeps restarting every 3 to 5 minutes, a faulty charging port flex could be the culprit.
The charging port flex has a temperature sensor, and if it malfunctions, it might not detect whether the phone is overheating, causing the device to restart.
Other potential issues include app crashes, software update failures, and corrupted system files.
If the problem is with the charging port flex (which I’ll show you how to diagnose later in this guide), it’s recommended to replace the entire charging port flex for models before the iPhone XS.
In newer iPhone models like the iPhone XS, XS Max, and the 11, 12, and 13 series, the charging port is part of a flex cable assembly that can include multiple components, such as microphones, sensors, and even haptic feedback mechanisms.
This makes it more common to replace only the faulty part (like the charging port) instead of the entire assembly.
Replacing the entire flex can sometimes cause forced reboots due to sensor failures.
Additionally, if you recently dropped your phone and the issue started afterward, it might be due to damaged or loose internal components, which could be causing the boot loop.
For earlier iPhone models, water damage such as even a small amount of water inside the phone could also be a issue.
I know all this tech talk might seem a bit boring, but I’m giving you the full picture so that if the solutions below don’t work, you will know what to do next.
Now, let’s explore the actual fixes.
Step 1: Force Restart your iPhone
I know you might have probably done it but again try it as A force restart is often the first step you should try when facing iPhone software issues.
It’s a simple and safe method that can help resolve temporary software glitches.
For iPhone 8 and Later:
- Quickly press and release the Volume Up button.
- Quickly press and release the Volume Down button.
- Press and hold the Side button until the Apple logo appears (this can take 10-15 seconds).
For iPhone 7 and 7 Plus:
- Press and hold both the Volume Down button and the Side button at the same time.
- Keep holding until the Apple logo shows up (usually about 10 seconds).
For iPhone 6s and Earlier:
Continue holding until you see the Apple logo (typically after 10-15 seconds).
Press and hold both the Home button and the Top/Side button together.
Now, the troubleshooting is divided into two parts. If you can access your iPhone’s screen for 3 to 5 minutes, follow the steps below. However, if you can’t even access the screen for that long, skip to the second part of the guide.
Troubleshooting Steps for iPhones That Stay On for 3 to 5 Minutes
If your iPhone stays on for just 3 to 5 minutes before going into a boot loop, this issue is often linked to a faulty charging port flex, especially in newer models. However, software problems can also be at fault.
Note: If you can access your iPhone for those 3 to 5 minutes, try to back up your data as soon as possible. because later when we do advanced troubleshooting, you might not be able to back up your data. Connect your iPhone to your computer and quickly transfer important files, or use iCloud if you have less data to back up. It’s better to do this now while you have the chance.
Step 2: Check your Panic log
First, go to settings of your iPhone and then scroll down and tap on privacy scroll down tap analytic and improvements, and then tap analytics data and Scroll down to the files starting with “panic-full…” & click on the most recent dated file.
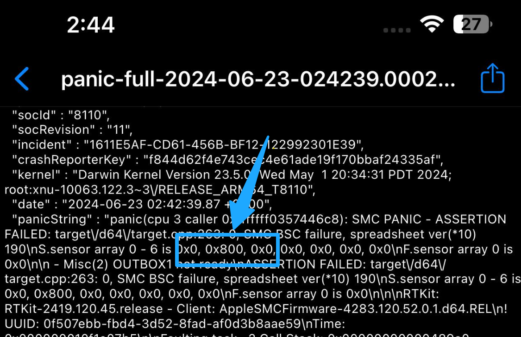
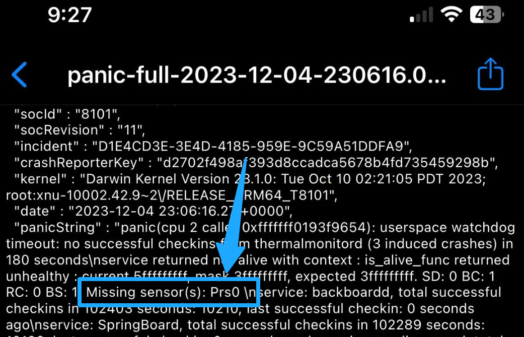
If you see an error code Prs0 or 0×800 in the panic log then it means your charging port has an issue the 0×800 means only the charging port while the Prso can be the whole charging flex so it is better to go to Apple repair or a reputable repair shop.
Well if you don’t see any issue there then congrats the issue might be of software so follow the next step.
Step 3: Check for Bad Apps
Sometimes, a specific app might be causing your iPhone to restart. Here’s how to check if an app is the culprit:
Go to Settings: Open your iPhone’s Settings app Scroll down and tap on “Privacy.”
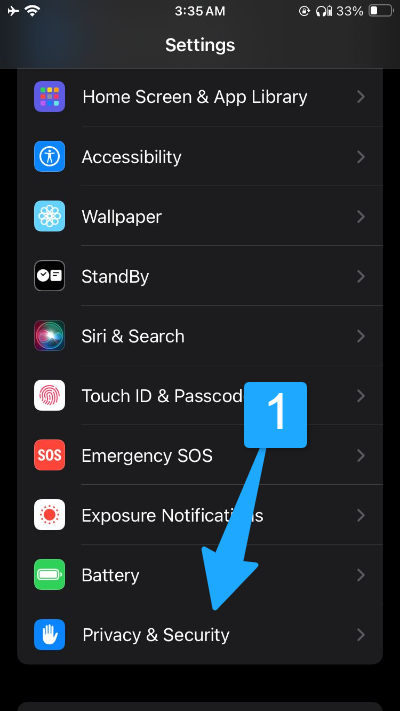
Select Analytics & Improvements: Scroll down and tap on “Analytics & Improvements.”

Tap Analytics Data: Choose “Analytics Data” from the list.

Once you’re in Analytics Data, look through the list for names of apps that appear repeatedly.
If you see one app mentioned a lot, it might be causing the issue. A few mentions are okay, but if an app shows up frequently, it could be problematic.
Typically, these logs indicate that the app is crashing and causing the iPhone to restart.
For example, if you see repeated mentions of an app like “cash app,” that might be the problem.
What to Do Next:
- Update the App: Check if there’s an update available for the app.
- Reinstall the App: Try deleting and reinstalling the app to see if that fixes the issue.
If the restarts always happen when using a particular app, these steps might help. However, if it doesn’t resolve the problem, the issue could be something else. so follow the next step.
Step 4: Check Your Battery Health
For newer iPhone models, the battery is less likely to be the cause of restarting issues, but it’s still possible to receive a device with a faulty battery from the start.
To check your battery health:
- Open Settings: Go to your iPhone’s Settings app.
- Tap Battery: Scroll down and select “Battery.”
- Select Battery Health: Tap “Battery Health.”

If your battery health shows 100% capacity and peak performance capability, your battery is in good shape. Even if it’s around 70% or 60%, it’s usually not a major concern.
Note: if your battery health is as low as 20% or 15%, or if a new phone shows significantly low battery health (like 60%), this might indicate a problem. In such cases, contact Apple for a replacement or a refund.
Step 5: Free Up More Space
Check your storage if it’s full, it might be causing the boot loop. iPhones need extra space for booting up and updates, so a lack of storage can lead to issues.
To check your storage Go to Settings > General > [Device] Storage

If your storage is indeed full, clear out unnecessary files to free up some space.
We’re tackling this step-by-step to pinpoint the problem, and this is a crucial part of that process.
If you follow all these steps and still have no luck, advanced solutions may be necessary.
However, these could result in data loss, so I recommend trying all the simpler fixes first to avoid losing your data
Step 6: Check the SIM Card
For iPhone 12 and newer models, or iPhone 8 and older, the SIM tray is on the left side. For those in-between models, it’s usually on the right side.
Grab a SIM card ejector tool or, if you’re like most of us, a paperclip. Gently press it into the small hole next to the SIM tray to pop it out.
Then, take out the SIM card and then force restart your iPhone this simple step might just help your phone get back from the boot loop.
If this solves the issue, you can go ahead and put your SIM card back into your iPhone. If the problem persists, move on to the next step.
Step 7: Reset All Settings
Next, let’s reset all settings on your iPhone. This process can help resolve issues by restoring your settings to their factory defaults, which might fix the problem.
Here’s how to do it:
Open the Settings app. Go to General. Scroll down and tap Transfer or Reset iPhone


Tap Reset then Select Reset All Settings.


This will reset all settings, including Bluetooth connections, Wi-Fi passwords, and your wallpaper.
It’s a bit of a hassle, but it can often resolve these types of problems and is worth a try before moving on to more complex solutions.
Reset all settings will not delete your data
If these troubleshooting steps haven’t worked for you, it’s time to move on to the more advanced solutions.
Advanced Troubleshooting Steps for iPhones That Stuck on Boot Loop
These solutions will help with iPhones stuck in a boot loop and those that keep restarting after 3 to 5 minutes.
So I will be using now the Iphone recovery mode and DFU mode.
Understanding iPhone Recovery Mode vs. DFU Mode
Here’s a simple breakdown of what each does and how they differ:
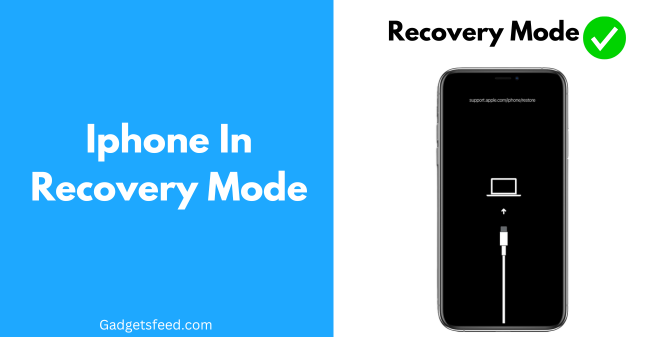
Recovery Mode
- Purpose: Recovery Mode helps when your iPhone is having trouble with iOS and needs restoring or updating. It loads a basic version of iOS and connects to iTunes/Finder.
- When to Use: Use Recovery Mode if your iPhone is stuck on the Apple logo or behaving in a way that prevents normal operation.
- How to Access: Your screen will show a connect-to-iTunes logo or a recovery message when you’re in this mode.
DFU Mode (Device Firmware Update)
- Purpose: This is your heavy-duty fixer. DFU Mode lets you restore or update your iPhone’s firmware without using the current operating system. Think of it as your last-resort tool for major fixes if recovery mode fail to do the update.
- When to Use: Go for DFU Mode if you need to restore your iPhone to factory settings, update firmware without booting up the current OS, or even downgrade iOS versions.
- How to Access: You’ll have to press a specific combination of buttons. If done right, your screen will stay black.

So DFU Mode is your go-to for deeper issues when Recovery Mode doesn’t do the trick. Both have their roles in getting your iPhone back to working order.
So let first try recovery mode.
Step 8: Recovery Mode and Restore Your iPhone
Use an Apple-certified USB cable to connect your iPhone to your computer.
Make sure iTunes (or Finder on macOS Catalina or later) is open.
Note: Make sure the iTunes is updated to the latest version
Enter Recovery Mode:
Depending on your iPhone model, follow these steps:
- For iPhone 8 and Later:
- Press and quickly release the Volume Up button.
- Press and quickly release the Volume Down button.
- Press and hold the Side button until you see the recovery mode screen (a computer and cable icon, make sure to not release the button on apple logo).
- For iPhone 7 and 7 Plus:
- Press and hold both the Volume Down button and the Side button simultaneously.
- Keep holding them until the recovery mode screen appears.
- For iPhone 6s and Earlier:
- Press and hold both the Home button and the Top/Side button together.
- Continue holding until you see the recovery mode screen.
Update or Restore:
On your computer, you will see a message saying there’s a problem with your iPhone and asking you to update or restore it.
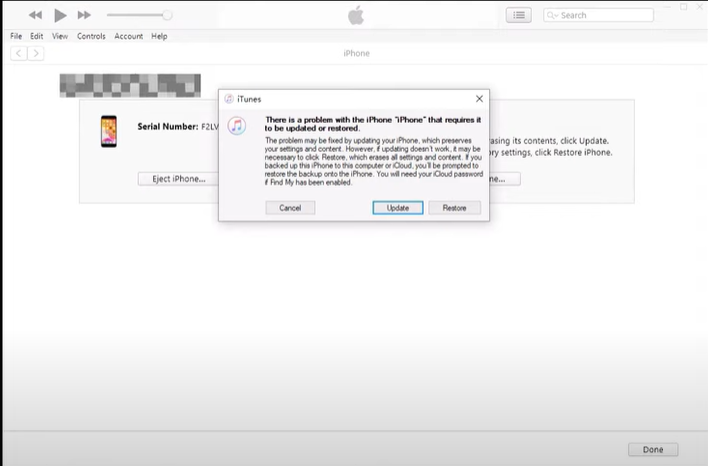
Choose Update: This will download and install the latest iOS without deleting your data. If successful, your iPhone should boot up normally.
If Update Fails: Repeat the steps to enter Recovery Mode, then choose Restore.
This will erase all settings and data from your iPhone. If you backed up your iPhone to iCloud or your computer, you can restore your data afterward.
If the recovery mode is also not working for you the last advanced troubleshooting step is DFU mode.

Pro tip: If you see errors 9, 4005, 4013, or 4014 then try to update your device again · Make sure that your Mac has the latest version of macOS or the latest version of iTunes
Step 9: DFU Mode to fix the Restarting of your iPhone
Step 1: Connect Your iPhone to a Computer
As before, connect your iPhone to a computer with iTunes or Finder installed.
Step 2: Enter DFU Mode
The steps to enter DFU mode differ slightly from Recovery Mode:
- For iPhone 8 and Later:
- Quickly press and release the Volume Up button, then quickly press and release the Volume Down button.
- Press and hold the Side button until the screen goes black.
- While holding the Side button, press and hold the Volume Down button for 5 seconds.
- Release the Side button but keep holding the Volume Down button for another 10 seconds. If the screen stays black, your iPhone is in DFU mode.
- For iPhone 7 and 7 Plus:
- Press and hold both the Volume Down and Side buttons for 8 seconds.
- After 8 seconds, release the Side button but keep holding the Volume Down button until your iPhone shows up in iTunes or Finder.
- For iPhone 6s and Earlier:
Press and hold both the Home button and the Top/Side button for 8 seconds.
- After 8 seconds, release the Top/Side button but keep holding the Home button until your iPhone shows up in iTunes or Finder.
Step 3: Restore Your iPhone
Once your iPhone is in DFU mode, you should see a message in iTunes or Finder indicating that your iPhone needs to be restored.
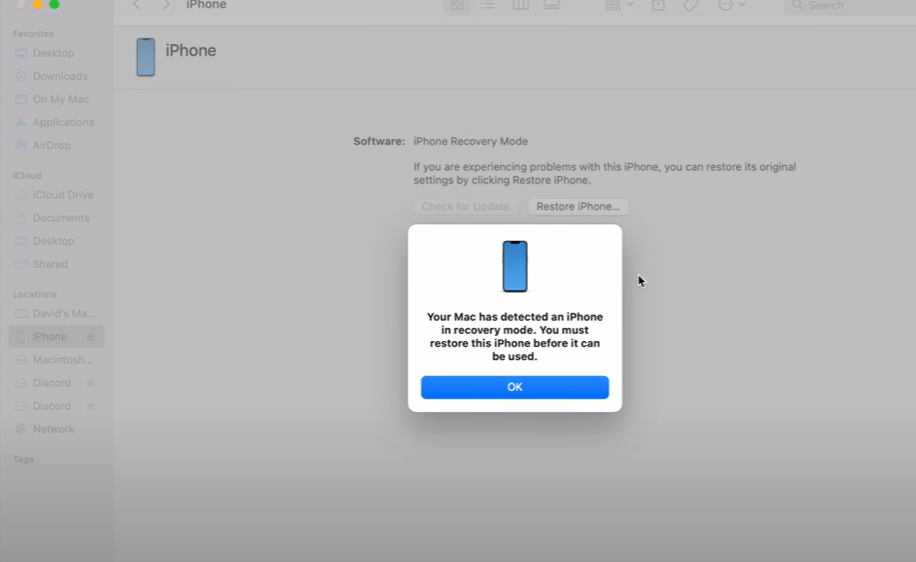
Click Restore and follow the prompts.
Now you have to exit DFU mode, here’s a quick guide:
- Perform a Hard Reset:
- Unplug your iPhone from the computer.
- Quickly press and release the Volume Up button.
- Quickly press and release the Volume Down button.
- Press and hold the Side button until the Apple logo appears.
- Setup After DFU Restore:
- Once you see the Hello screen, unplug your iPhone.
- If you have an iCloud backup, set up your iPhone directly.
- If you have an iTunes backup, leave it connected and follow the setup process.
If you can’t get into DFU mode what to do?
- Try Different Ports and Cables: Switch to another USB port or cable if you’re having trouble.
- Clean the Charging Port: Remove any lint or debris from the port.
- Disable Antivirus Software: If you’re using a PC, turn off antivirus software as it may interrupt the process.
If DFU Mode Isn’t Working for you then it possible Your iPhone may be broken if it’s not detected even after multiple attempts. This could be due to severe hardware issues like water damage or drops.
Contact Apple Support
As I mentioned earlier, if the issue seems hardware-related and you’re not tech-savvy, it might be best to visit an Apple Genius Bar.
If that’s not an option in your country, a reputable local repair shop can also help. Just make sure to choose one with a good track record for repairs.
Final Word
Dealing with an iPhone stuck in a restart loop can be annoying, but by now, you’ve got the know-how to tackle it head-on.
Most of the time, it’s just a software glitch that can be handled with a few troubleshooting steps and some patience.
If you’ve tried everything and it’s still acting up, don’t hesitate to reach out to Apple Support. They’ve got your back. Best of luck, and hopefully, your iPhone will be back to normal in no time!”

Hi, I’m Michael Davis, the owner and writer of GadgetsFeed.com. This website is where I share my knowledge and passion for tech, laptops, and computers. I’m a software engineer by profession, and I enjoy testing and reviewing various gadgets and technologies. I started GadgetsFeed.com to help others find easy solutions for their laptop, computer, and tech problems.
