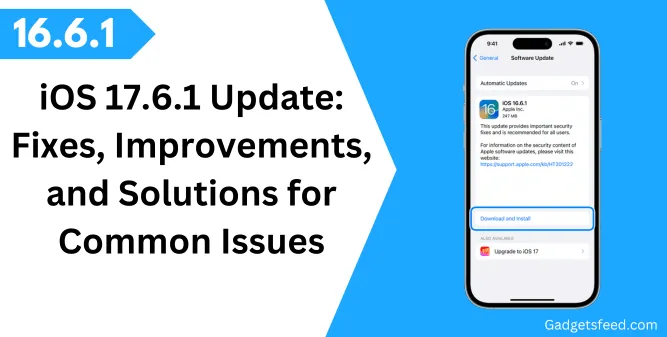
Apple has recently released the iOS 17.6.1 update for all compatible iPhones and iPads.
This latest update brings a host of important fixes and enhancements designed to improve your device’s performance and security.
With iOS 17.6.1, users can expect resolutions to several notable issues, including problems with Advanced Data Protection and Apple Fitness Plus access.
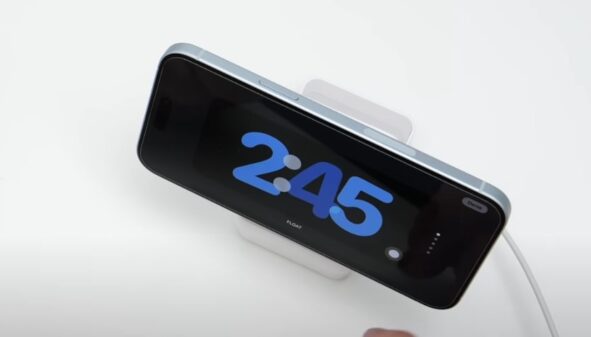
Also, the update introduces performance improvements and resolves bugs related to standby mode.
In this article, I will dig deep into the update and will show what you can expect from the update, including the update key fixes, new features, and how to address any common issues that might arise.
If you are considering whether to upgrade, read on to find out how this update could impact your device.
Key Fixes and Improvements in iOS 17.6.1 Update
Here’s what you need to know about the latest iOS 17.6.1 update:
- Advanced Data Protection: It now fixes issues that prevent you from enabling or disabling Advanced Data Protection for iCloud, enhancing your data security.
- Apple Fitness Plus Access: If you were having trouble accessing Apple Fitness Plus, this update resolves that problem so you can get back to your workouts seamlessly.
- Standby Mode: Expect smoother performance in standby mode with fixes for previous bugs like editing issues and screen tearing.
New Features and Improvements:
Enhanced Data Security: Enjoy improved encryption settings for iCloud, offering better protection for your data.
Performance Boost: Experience better performance with improved multi-core scores and efficient heat management.

Additional Updates: The update also brings new features such as Apple Podcasts on the web, the NFL season in Apple Sports, and support for exploring national parks with Apple Maps.
Common Issues Reported with iOS 17.6.1 Update
1) No Service (No Cellular Data)
Many Users encounter the “No Service” or “No Cellular Data” after updating to iOS 17.6.1, don’t worry you’re not alone, and there are steps you can take to fix it.
Let me walk you through a few solutions that have worked for others.
Force Restart Your iPhone
First, let’s try a simple force restart. Sometimes, this alone can solve the issue:
- Quickly press and release the Volume Up button.
- Quickly press and release the Volume Down button.
- Press and hold the Side button until the Apple logo appears, then release it.

If that doesn’t work, don’t worry there are other things we can try.
Delete Your VPN Profile
Sometimes, a VPN can cause connectivity issues after an update. Even if you don’t use one personally, work-related apps might have installed one.
To delete your VPN, follow these steps:
Go to Settings on your iPhone and Tap General.
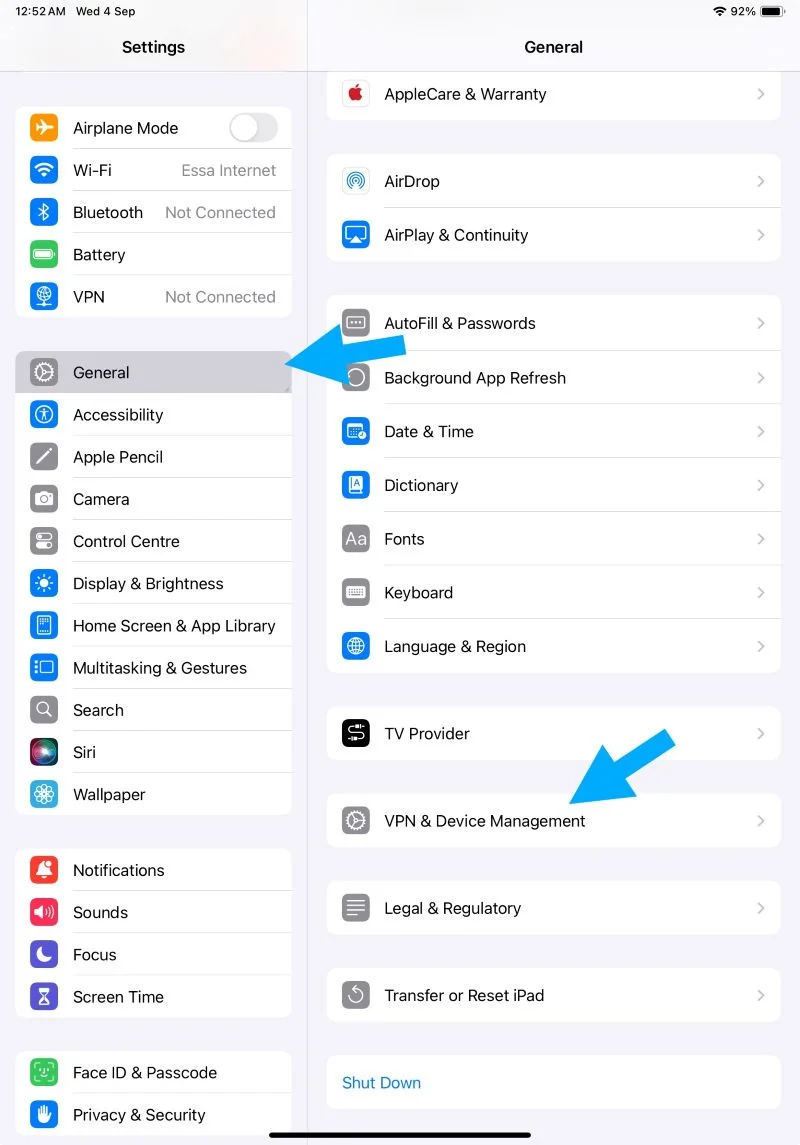
Scroll down and select VPN & Device Management.
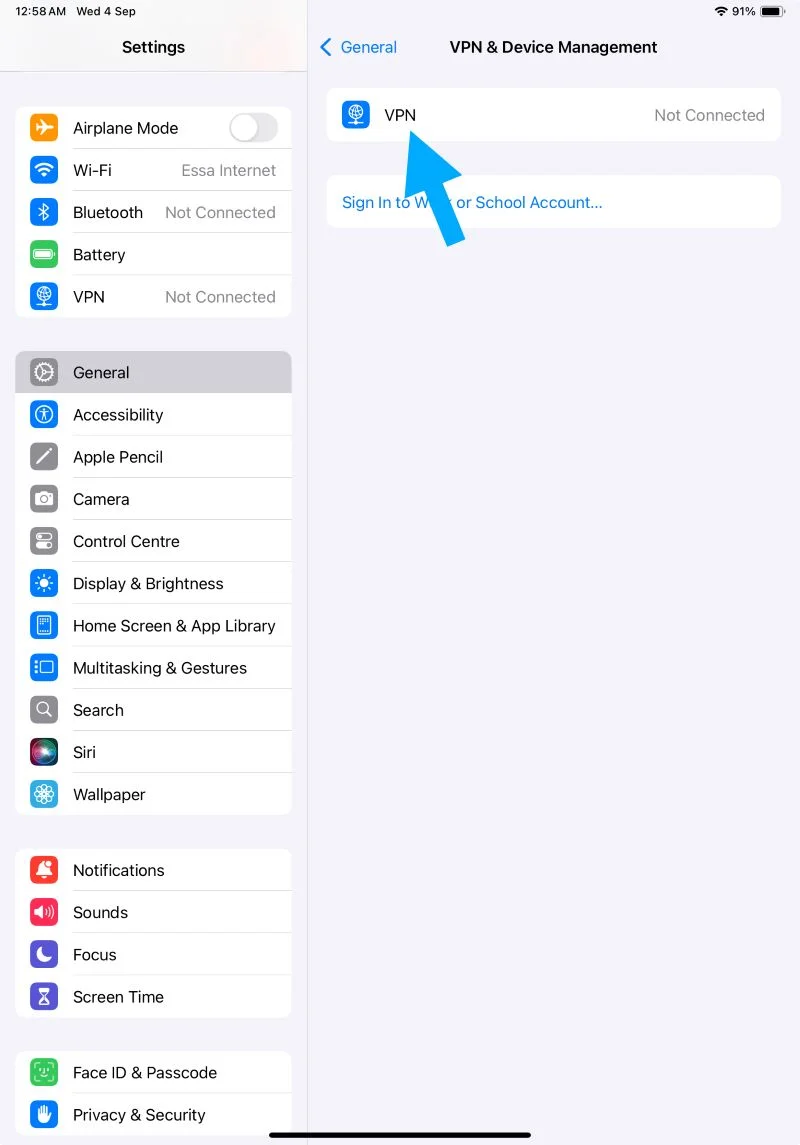
Tap VPN, then select your VPN profile Delete the VPN, and confirm.
If your VPN was installed through an app, you might want to uninstall that app as well. Just long-press the app icon on your Home screen, select Delete App, and confirm.
Reset Network Settings
If the VPN fix didn’t help, resetting your network settings might do the trick. Just a heads-up: this will erase your saved Wi-Fi passwords and VPN settings.
Note: Resetting your network settings will delete all of your network information. This includes Wi-Fi passwords and information about your VPNs.
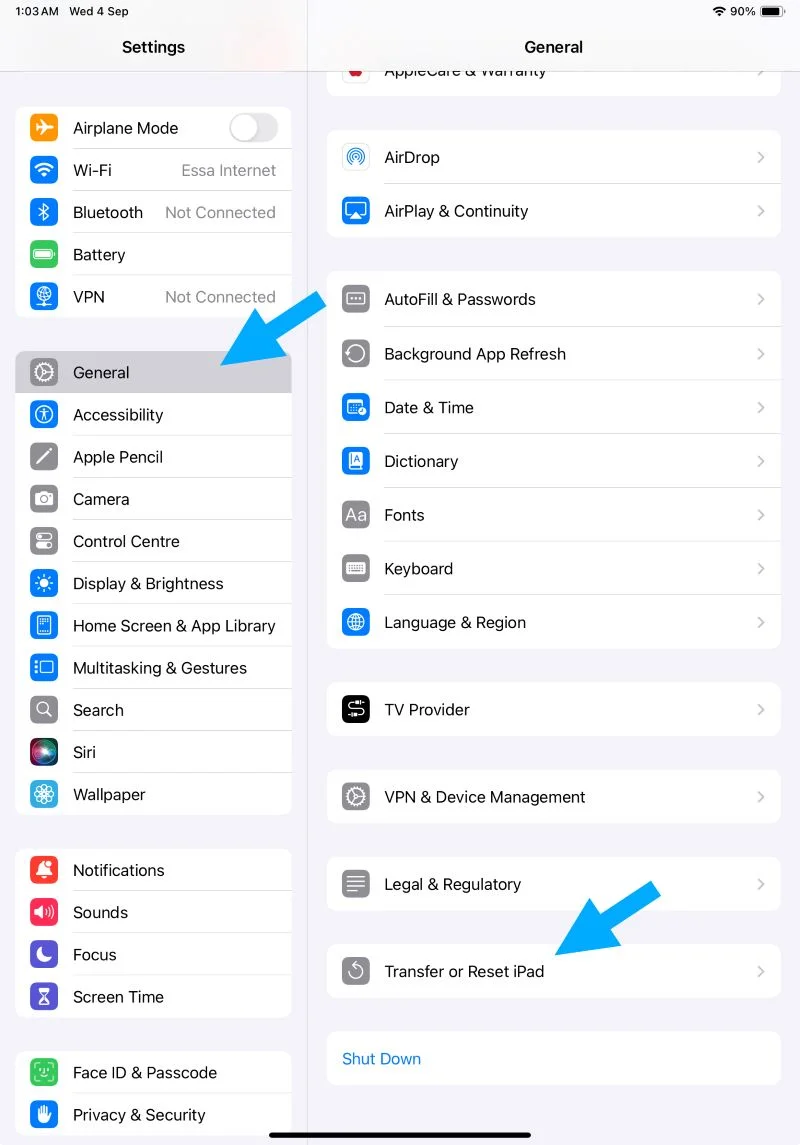
Go to Settings and tap General. Scroll down and select Transfer or Reset iPhone.
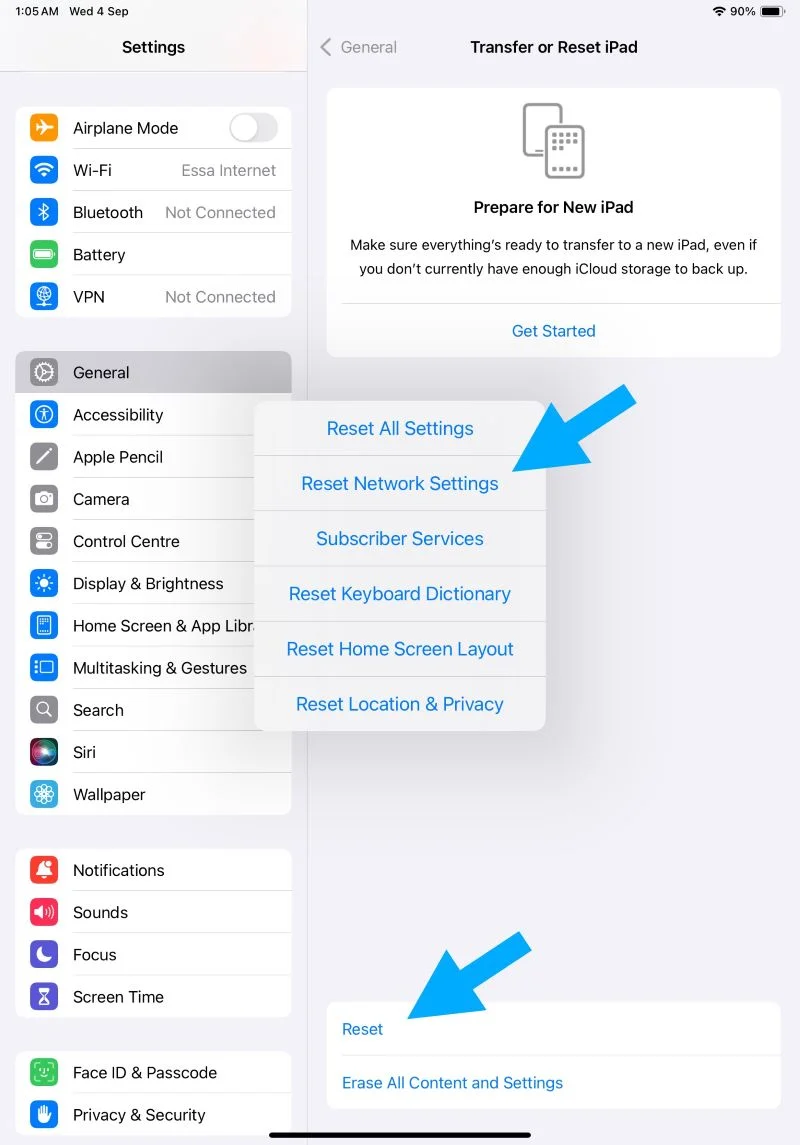
Tap Reset. Choose Reset Network Settings and enter your passcode.
Restore Your iPhone from a Backup
If you have a backup from before the update, restoring your iPhone to that backup might solve the problem.
Remember, you can’t create a new iCloud backup on iOS 17.6.1, so only restore from an older one if you have it.
Contact Your Service Provider or Apple Support
If none of the above solutions worked, it might be time to contact your service provider.
Sometimes replacing your eSIM or SIM card can help. It’s also a good idea to reach out to Apple Support—they might have additional solutions for you.
I know it’s frustrating to deal with these issues, but hopefully, one of these steps will get you back up and running!
2) iPhone Overheating
If your iPhone is overheating after the iOS 17.6.1 update, there are ways to cool things down. Here’s how you can address the issue.
1. Hard Reset Your iPhone
Sometimes, a simple hard reset can work as mostly after the update there are some glitches and bugs which after hard resetting can fix on it own.
- Press and quickly release the Volume Up button.
- Press and quickly release the Volume Down button.
- Press and hold the Side Button until the Apple logo appears, then release it.
This should help your iPhone reset any minor bugs that might be causing it to overheat.
2. Check Your Battery and Background Apps
Next, let’s take a closer look at your battery and background activity. A third-party app may be causing your iPhone to overheat.
Check Your Battery Health: Go to Settings > Battery > Battery Health to see how your battery is doing. If it’s in good shape, your battery might not be the problem.
Manage Background Apps:
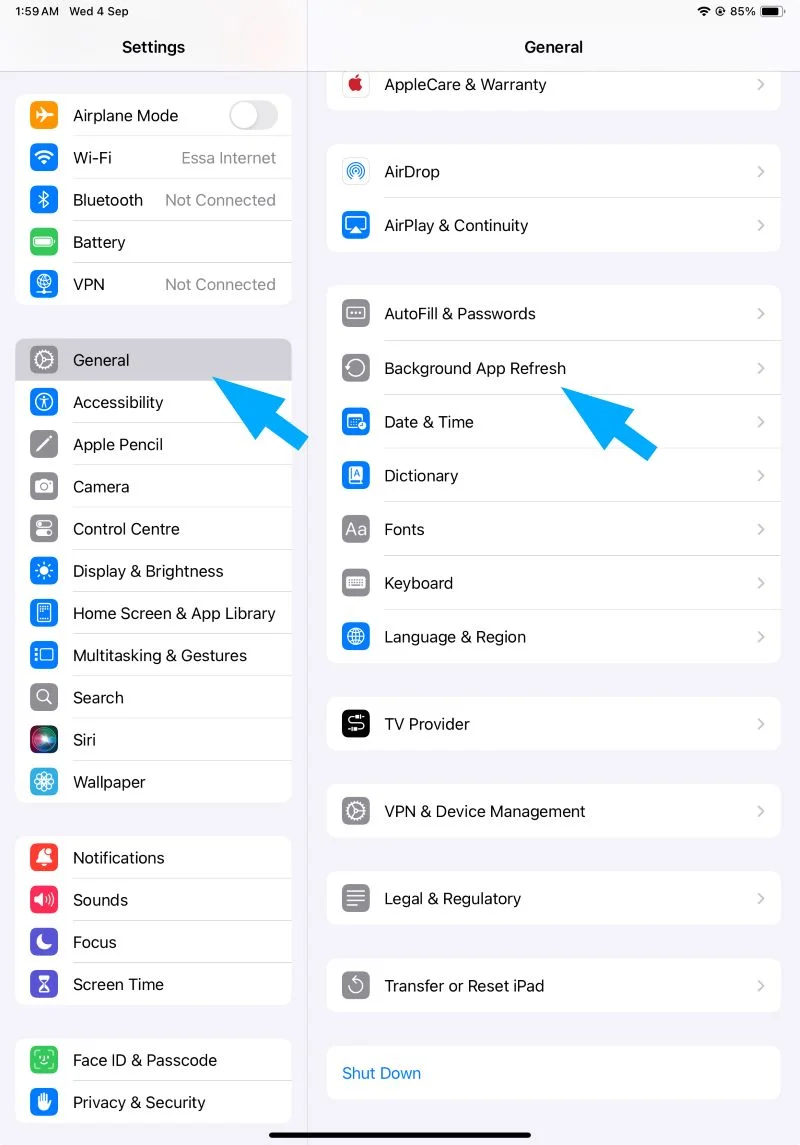
Go to Settings > General > Background App Refresh. Here, you can see which apps are running in the background.
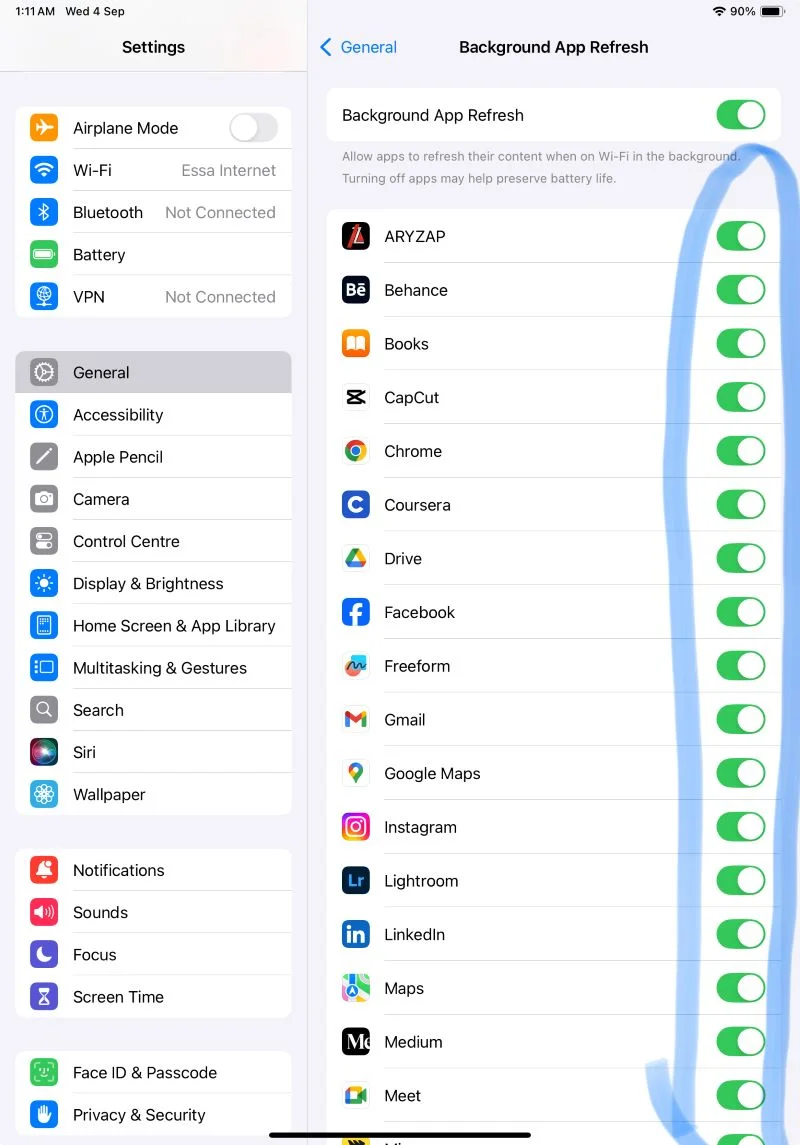
You can disable background refresh for apps you suspect might be causing issues, or turn it off entirely.
If you find an app that’s using too much energy, consider uninstalling it, especially if it’s not fully compatible with iOS 17.6.1.
3. Contact Apple Support
If the overheating persists, it might be time to talk to Apple Support. While a hard reset usually helps, there could be a deeper issue with your battery or another component.
Apple Support can guide you through more advanced troubleshooting or recommend further action.
Note,: Taking care of your iPhone’s battery is key to preventing issues like overheating. Avoid extreme temperatures and try to keep your battery level between 20% and 80% for the best results.
3) iPhone Lagging and Freezing iOS
Many users have also reported iPhone is lagging or freezing after updating to iOS 17.6.1, including frame drops, keyboard freezing, and a sluggish browsing experience.
Here are some fixes you can try.
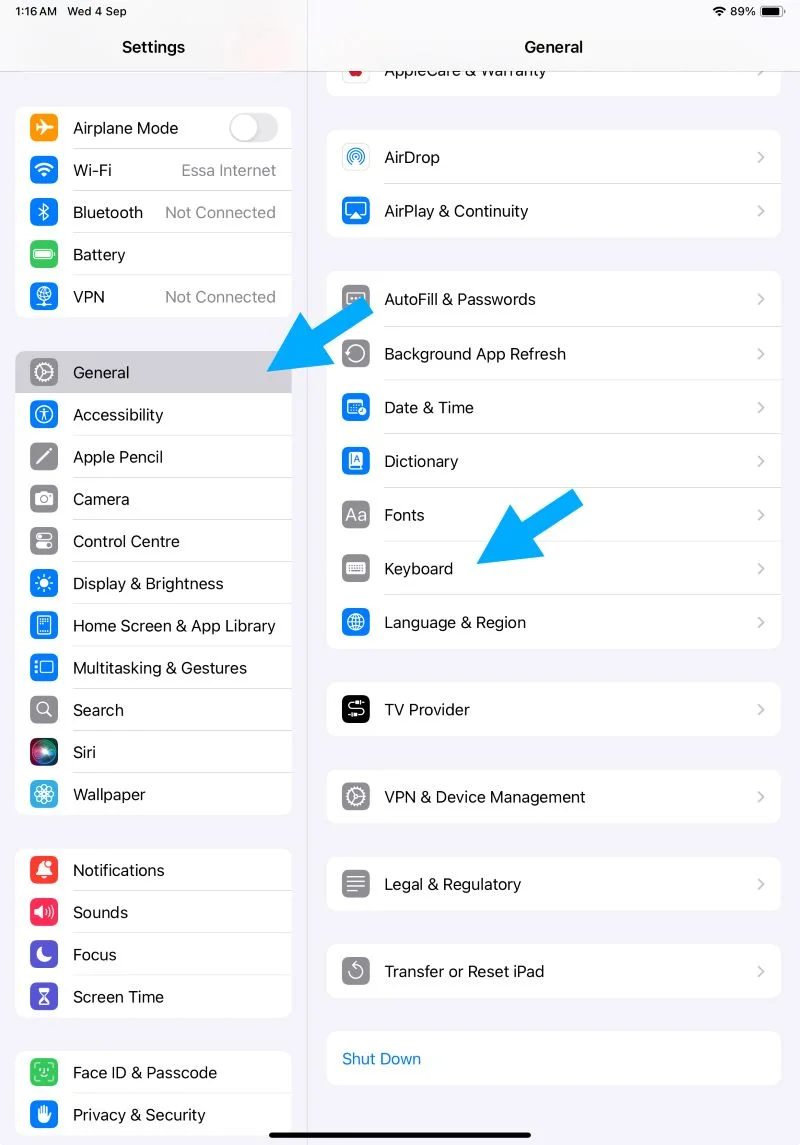
1. Change Keyboard Settings
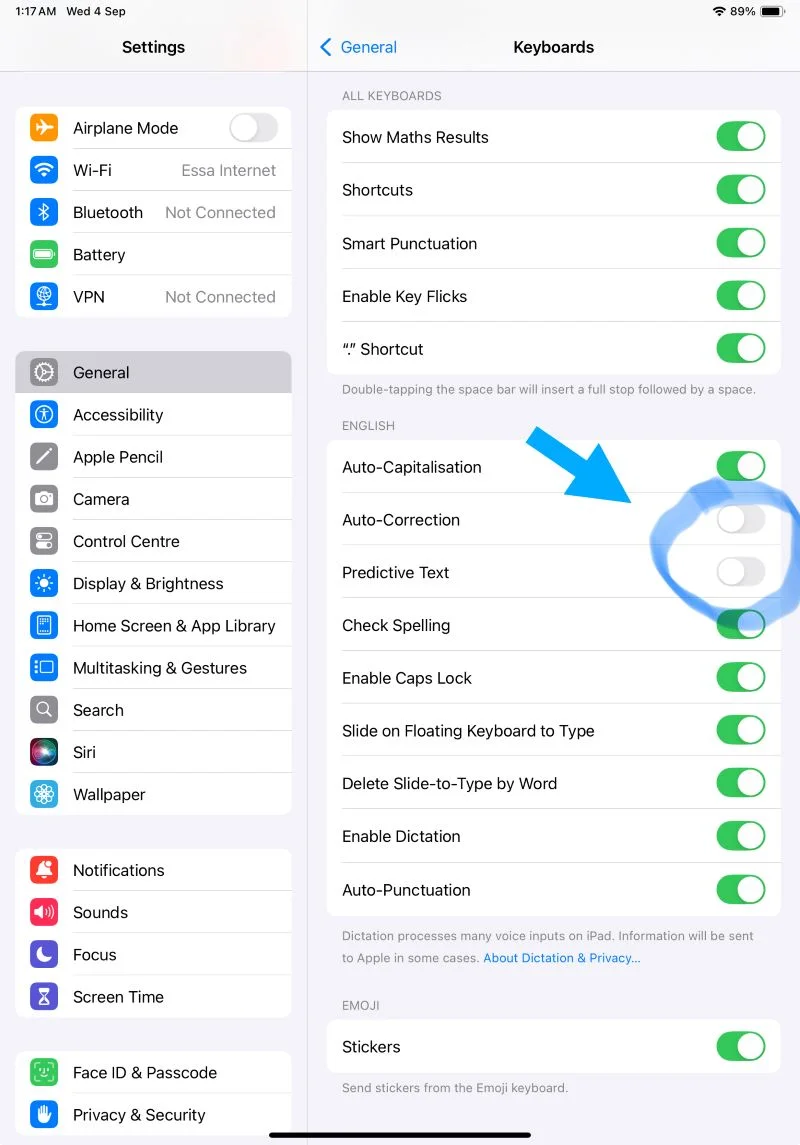
iOS 17 introduced an improved Auto-Correction and Predictive Text feature, but these enhancements can be resource-intensive, especially on older iPhones. Disabling these features might help resolve the lagging issues.
Steps to Disable Auto-Correction and Predictive Text:
Open Settings on your iPhone then Go to General and tap on Keyboard.
Disable the Auto-Correction and Predictive Text toggles.
2. Remove and Re-Add Dictionaries
Sometimes, the dictionaries installed on your iPhone can cause lagging. Removing and re-adding them might help.
Go to Settings > General > Dictionary. Unselect all the dictionaries. Restart your iPhone.

Go back to Settings > General > Dictionary and re-download the dictionaries you need.
3. Disable Siri Contact Suggestions
Disabling Siri’s contact suggestions can free up some processing power, which may help reduce lag.
Steps to Disable Siri Contact Suggestions:
- Open Settings and go to Contacts.
- Tap on Siri & Search.
- Disable the Learn from this App and Show Contact Suggestions toggles.

4. Change Your Wallpaper
Wallpapers with too many elements can cause your iPhone to lag. Opting for a simpler wallpaper might help.
Steps to Change Your Wallpaper:
- Go to Settings > Wallpaper.
- Swipe through the current options or tap Add New Wallpaper to choose a simpler design.
5. Clear Safari History and Data
If Safari is lagging or freezing, clearing its history and data can improve performance.
- Open Settings and navigate to Safari.
- Tap Clear History and Website Data.
- Select All History from the Clear Timeframe menu.
- Scroll down, tap Advanced > Website Data > Remove All Website Data, and confirm.
6. Clear Background Apps
Background apps can consume RAM, leading to lagging. Clearing them might free up resources.
Steps to Clear Background Apps:
- For iPhones with Face ID: Swipe up and hold on the Home Screen.
- For iPhones with Touch ID: Double-tap the Home Button.
- Swipe up on all apps in the Recent Apps tray.
7. Force Restart Your iPhone
A force restart can clear temporary bugs and glitches, which might be causing lag.
Steps to Force Restart:
- Press and release the volume up button.
- Press and release the volume down button.
- Next, press and hold the Side button until the Apple logo appears.
- As soon as you see the Apple logo, release the Side button. Please do not release the Side button before the Apple logo appears on the screen.
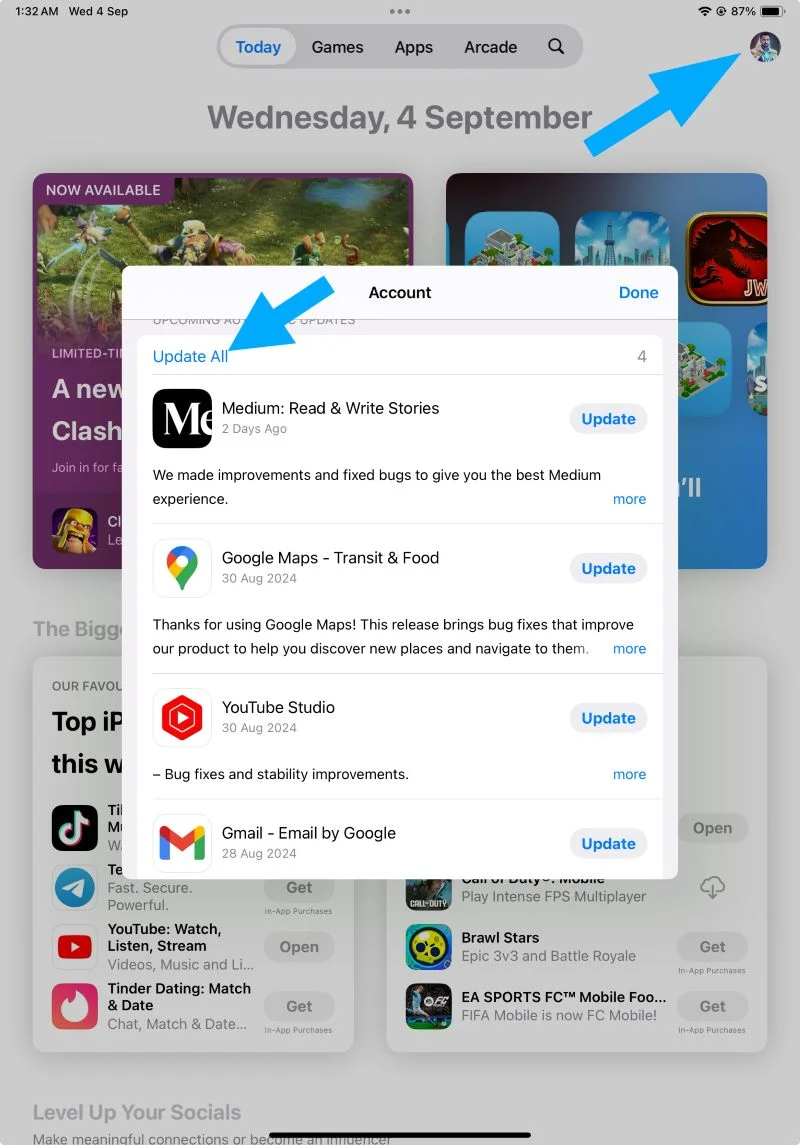
8. Update All Apps
Outdated apps can cause your iPhone to lag. Updating them might help.
- Open the App Store.
- Tap on your Profile at the top right corner.
- Scroll down to the Available Updates section and tap Update All.
9. Check Storage Space
Low storage space can cause your iPhone to lag. Freeing up space might help.
Steps to Check and Manage Storage Space:
Go to Settings > General > iPhone Storage.Review the amount of occupied and total storage space.
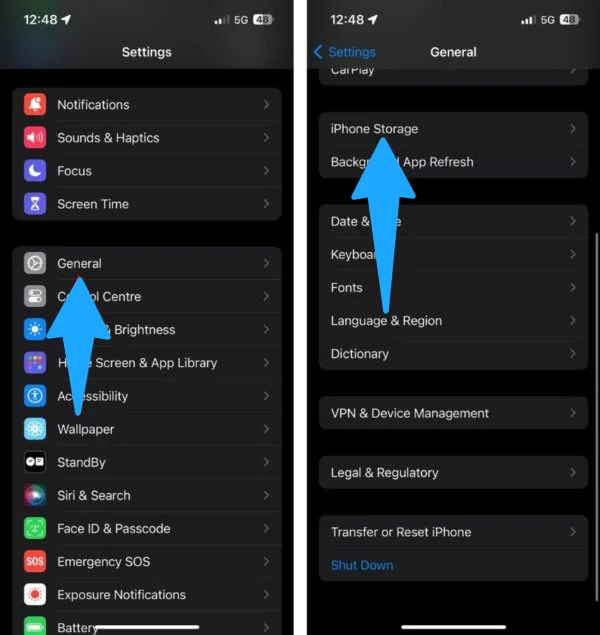
Delete apps or media files you don’t use to free up space.

10. Factory Reset iPhone
If none of the above methods work, consider a factory reset.
Hopefully, these steps help resolve the lagging and freezing issues on your iPhone after the iOS 17.6.1 update.
4) Extreme Battery Drain
After updating to iOS 17.6.1, many users have also reported that their iPhones are experiencing extreme battery drain.
This issue can be frustrating, especially when your battery drains within hours of a full charge.
Below are several potential fixes that could help solve this problem.
1) Force Restart Your iPhone
As we already cover a force restart can clear temporary glitches or processes that may be contributing to excessive battery consumption.
Steps for Force restart:
- Press and immediately release the Volume Up button.
- Press and immediately release the Volume Down button.
- Press and hold the Side button until the Apple logo appears.
- This process can be repeated weekly to help manage temporary bugs.
2) Change Your Wallpaper
Avoid using wallpapers with too many elements, such as those from the Weather & Astronomy or Live Photos categories, as these can drain your battery faster. Instead, opt for simpler designs.
Go to Settings > Wallpaper.
Choose a simpler design by swiping through the current options or tapping Add New Wallpaper.
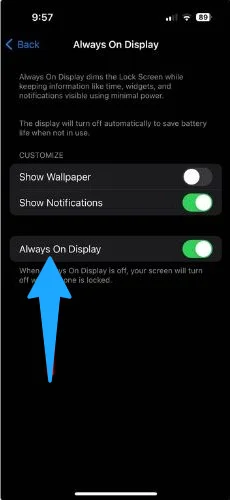
3) Turn Off Always-on Display
The Always-on Display feature, which shows a dimmed version of your lock screen at all times, can significantly drain your battery.
Go to Settings > Display & Brightness. Toggle off the Always-on Display button.
4) Turn Off Automatic Downloads on News+
Having News+ automatically download magazines can use a lot of resources.
Open Settings > News. Toggle off the Download Issue button.
5) Update All the Apps
Outdated apps may not be optimized for the latest iOS version, leading to increased battery usage.
Open the App Store and tap on your initials at the top-right corner.Tap on Update All.
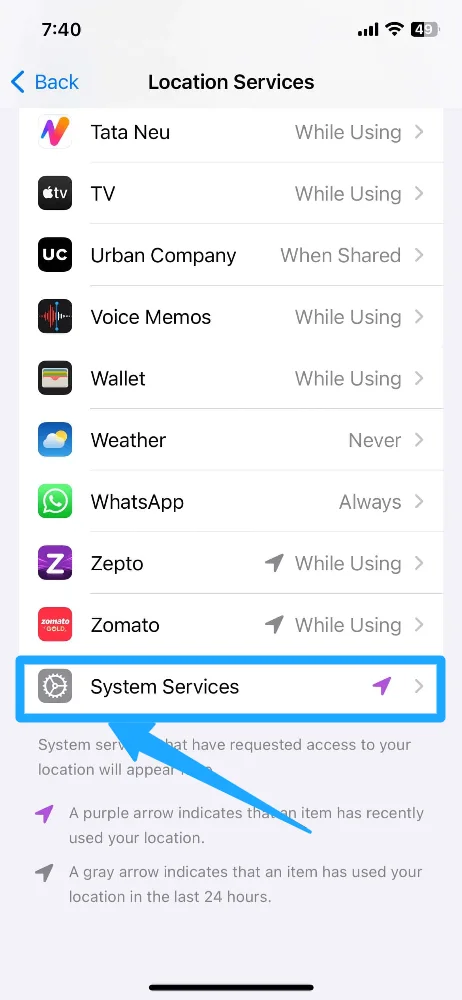
6) Disable Alerts and Shortcuts Automation
Alerts and Shortcuts Automation lets your iPhone use your location to remind you to call someone when you are at a specific location.
If you don’t use this feature a lot then its better to turn it off as this feature uses GPS, which can drain your battery quickly.
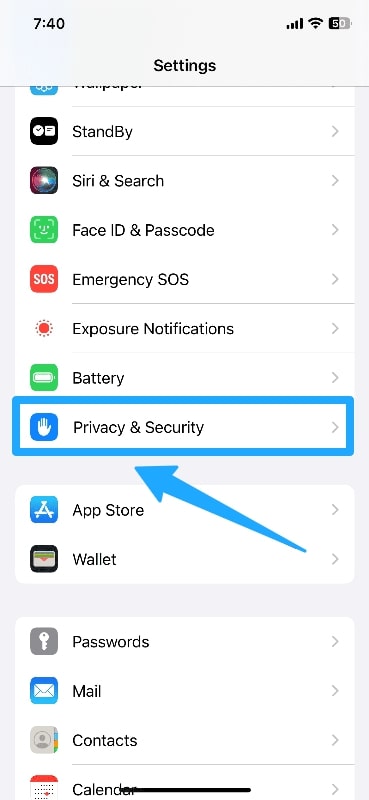
Open Settings > Privacy & Security

Scroll to the bottom and open the location Services . Disable Alerts and Shortcuts Automation.

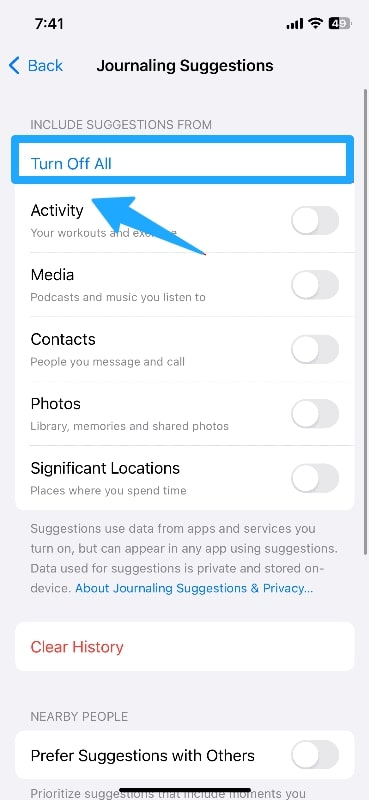
7) Turn Off Journaling Suggestions
If you’re not using the new Journal app and prefer to journel on your diary then it’s best to delete it or turn off its settings to save battery life.
Open Settings > Privacy & Security
Scroll down and tap on Journaling Suggestions.
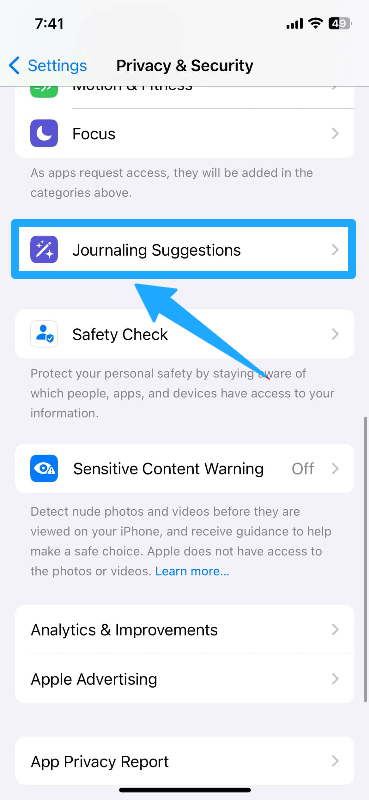
Select Turn Off All.
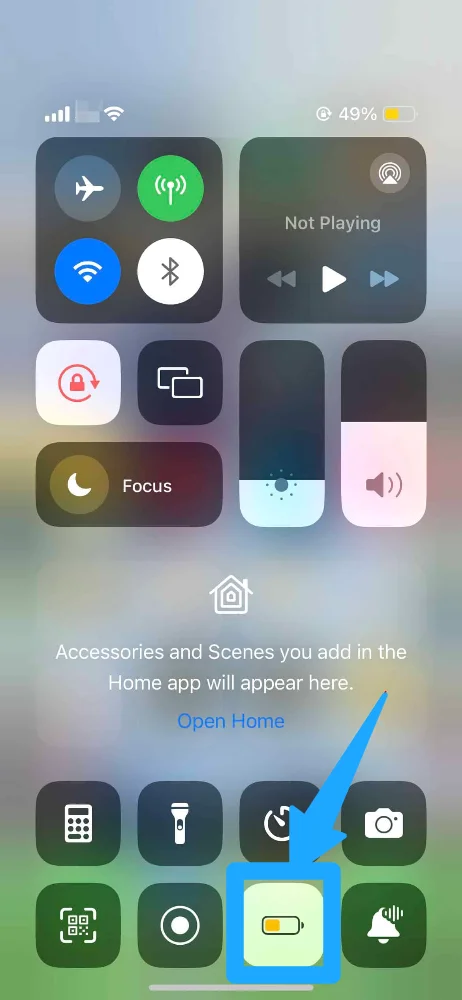
8) Enable Low Power Mode
This reduces background processes, visual effects, and mail fetching to preserve battery life during critical periods.
Slide down on your iPhone to open the Control Center.
Tap on the Battery icon to enable Low Power Mode.
9) Enable Auto-Lock
If your Auto-Lock is set to “Never,” your display will remain on, draining your battery.
Open Settings > Display & Brightness. Scroll down and tap on Auto-Lock.
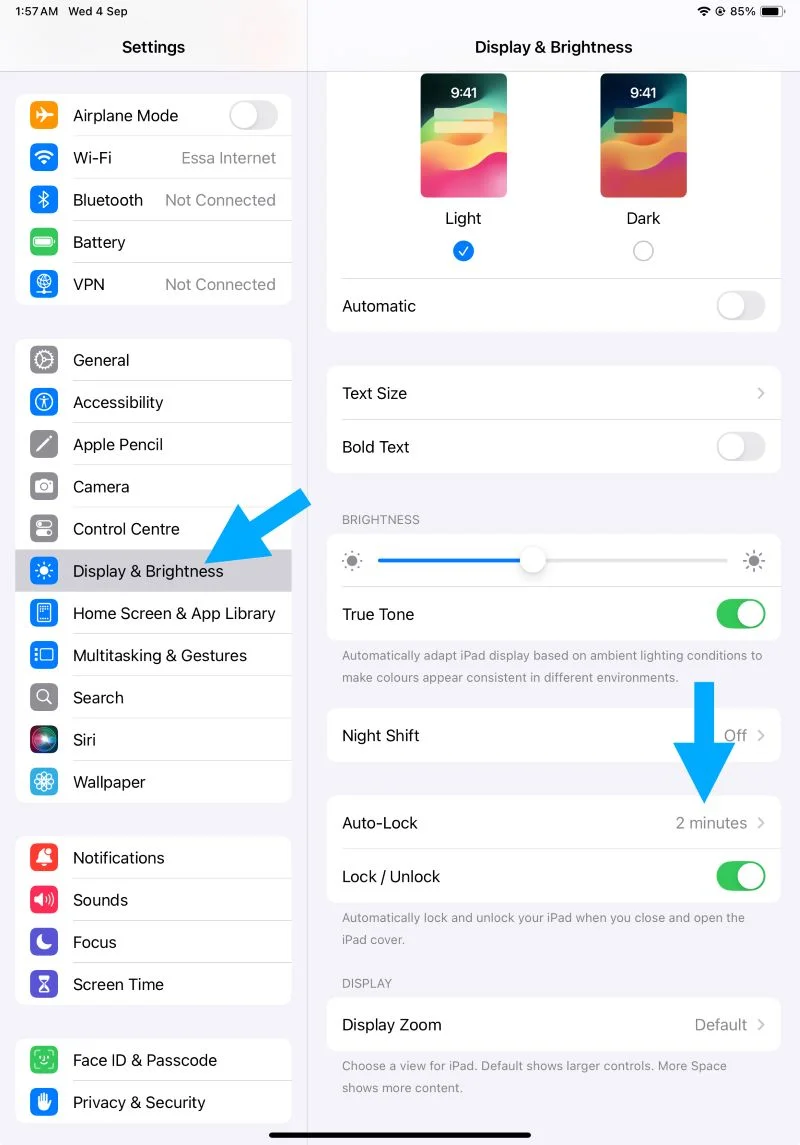
Select a shorter time duration to save battery life.
10) Disable Background App Refresh
Background App Refresh allows apps to refresh content in the background, which can lead to increased power consumption.
Open Settings > General > Background App Refresh.

You can either disable it entirely or select specific apps to disable.
11) Turn Off Keyboard Haptics
Keyboard haptics use additional power, so turning it off can help save battery.
Open Settings > Sound & Haptics
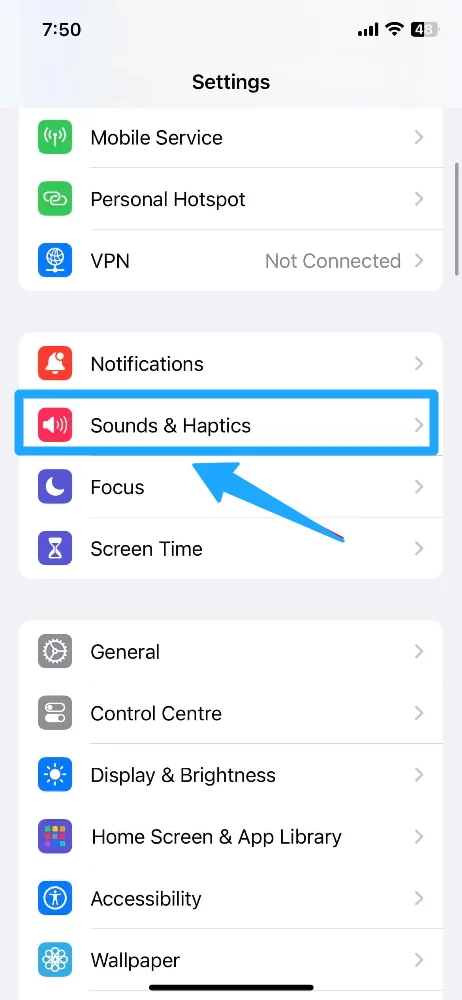
Then scroll down to Keyboard Feedback.
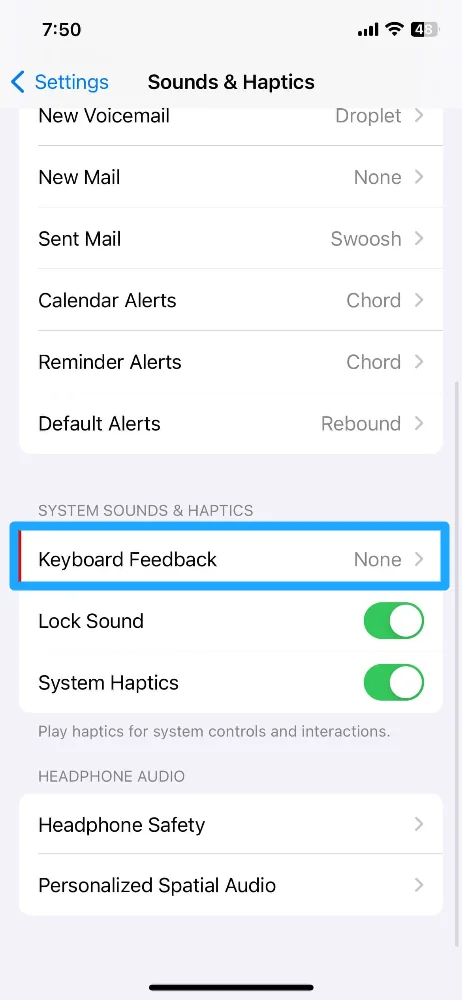
Disable Sound and Haptics.

12) Close Your Apps
Although there’s debate about whether this helps, closing background apps, especially those that may have crashed, can sometimes reduce battery drain.
Swipe up from the bottom (or double-tap the Home button) to view all running apps. Swipe up on each app to close it.
Wrapping up
It’s also worth noting that many users have reported no issues with the iOS 17.6.1 update.
Keeping your device up-to-date is generally a good practice, as updates often include important security patches and new features.
However, if you do experience any errors or bugs after updating, this guide has covered all the solutions to help you address them.
I hope this detailed guide has addressed your concerns and helped resolve any issues you’re facing with the iOS update.

Hi, I’m Michael Davis, the owner and writer of GadgetsFeed.com. This website is where I share my knowledge and passion for tech, laptops, and computers. I’m a software engineer by profession, and I enjoy testing and reviewing various gadgets and technologies. I started GadgetsFeed.com to help others find easy solutions for their laptop, computer, and tech problems.
