Every new 3D printer owner knows the sinking feeling of a first-layer failure—plastic spaghetti where your Benchy should be. The difference between a hobby and a headache often comes down to one decision: which machine brings you into the world of additive manufacturing without demanding you become a technician first. The “basic” label hides a wide gulf in real-world usability.
I’m Min — the co-founder and writer behind Gadgets Feed. I have spent hundreds of hours comparing print speeds, build volumes, and auto-leveling systems down to the exact XY-axis resolution and extrusion temperature range to separate the truly beginner-friendly machines from the tinkerer’s projects.
This guide evaluates nine models from to , focusing on automated calibration, out-of-box experience, and print reliability to help you identify the best basic 3d printer for your specific needs.
How To Choose The Best Basic 3D Printer
The market is saturated with options, but not every “basic” printer is simple. Three factors separate the machines that frustrate from those that deliver.
Auto Leveling: The Beginner’s Best Friend
Manual bed leveling with a piece of paper is a rite of passage, but it sours the experience for newcomers. Look for printers with automatic mesh bed leveling (like CR Touch or inductive sensors) that measure 16 to 36 points and adjust the nozzle height during printing. This feature alone can double your first-layer success rate.
Print Speed and Acceleration
A printer rated at 500 mm/s with 20,000 mm/s² acceleration can finish a Benchy in under 20 minutes, while older designs crawl at 60 mm/s. CoreXY structures maintain stability at high speeds, whereas bedslingers may wobble. Faster printing reduces the barrier to iterating on designs.
Build Volume and Material Compatibility
A 220 x 220 x 250 mm volume handles most practical objects—from phone stands to cosplay props. Nozzle temperatures above 260°C allow you to print PETG and TPU, while 300°C opens the door to ABS and polycarbonate. An enclosed chamber improves results with high-temperature materials but adds cost.
Quick Comparison
On smaller screens, swipe sideways to see the full table.
| Model | Category | Best For | Key Spec | Amazon |
|---|---|---|---|---|
| Bambu Lab A1 Combo | FDM | Multi-Color Printing | 10,000 mm/s² Accel, ≤48 dB | Amazon |
| Bambu Lab P1S | FDM | Enclosed Workhorse | 500 mm/s, 256x256x256 mm | Amazon |
| ELEGOO Centauri Carbon | FDM | Carbon Fiber Ready | 320°C Nozzle, CoreXY | Amazon |
| Creality K1C | FDM | High-Speed & AI | 600 mm/s, Clog-Free Extruder | Amazon |
| Creality Ender 3 V3 KE | FDM | Modding Potential | 500 mm/s, Sprite Extruder | Amazon |
| FLASHFORGE Adventurer 5M | FDM | Out-of-Box Simplicity | 600 mm/s, 32mm³/s Flow | Amazon |
| Entina Tina2C | FDM | Kids & STEM | 100x105x100 mm, App Control | Amazon |
| ANYCUBIC Photon Mono 4 | Resin | High Detail Prints | 10K LCD, 17×17 um Pixels | Amazon |
| Entina Tina2 Basic | FDM | Absolute Simplicity | Dual Z Rails, Auto Leveling | Amazon |
In‑Depth Reviews
1. Bambu Lab A1 Combo + LED Lamp Kit
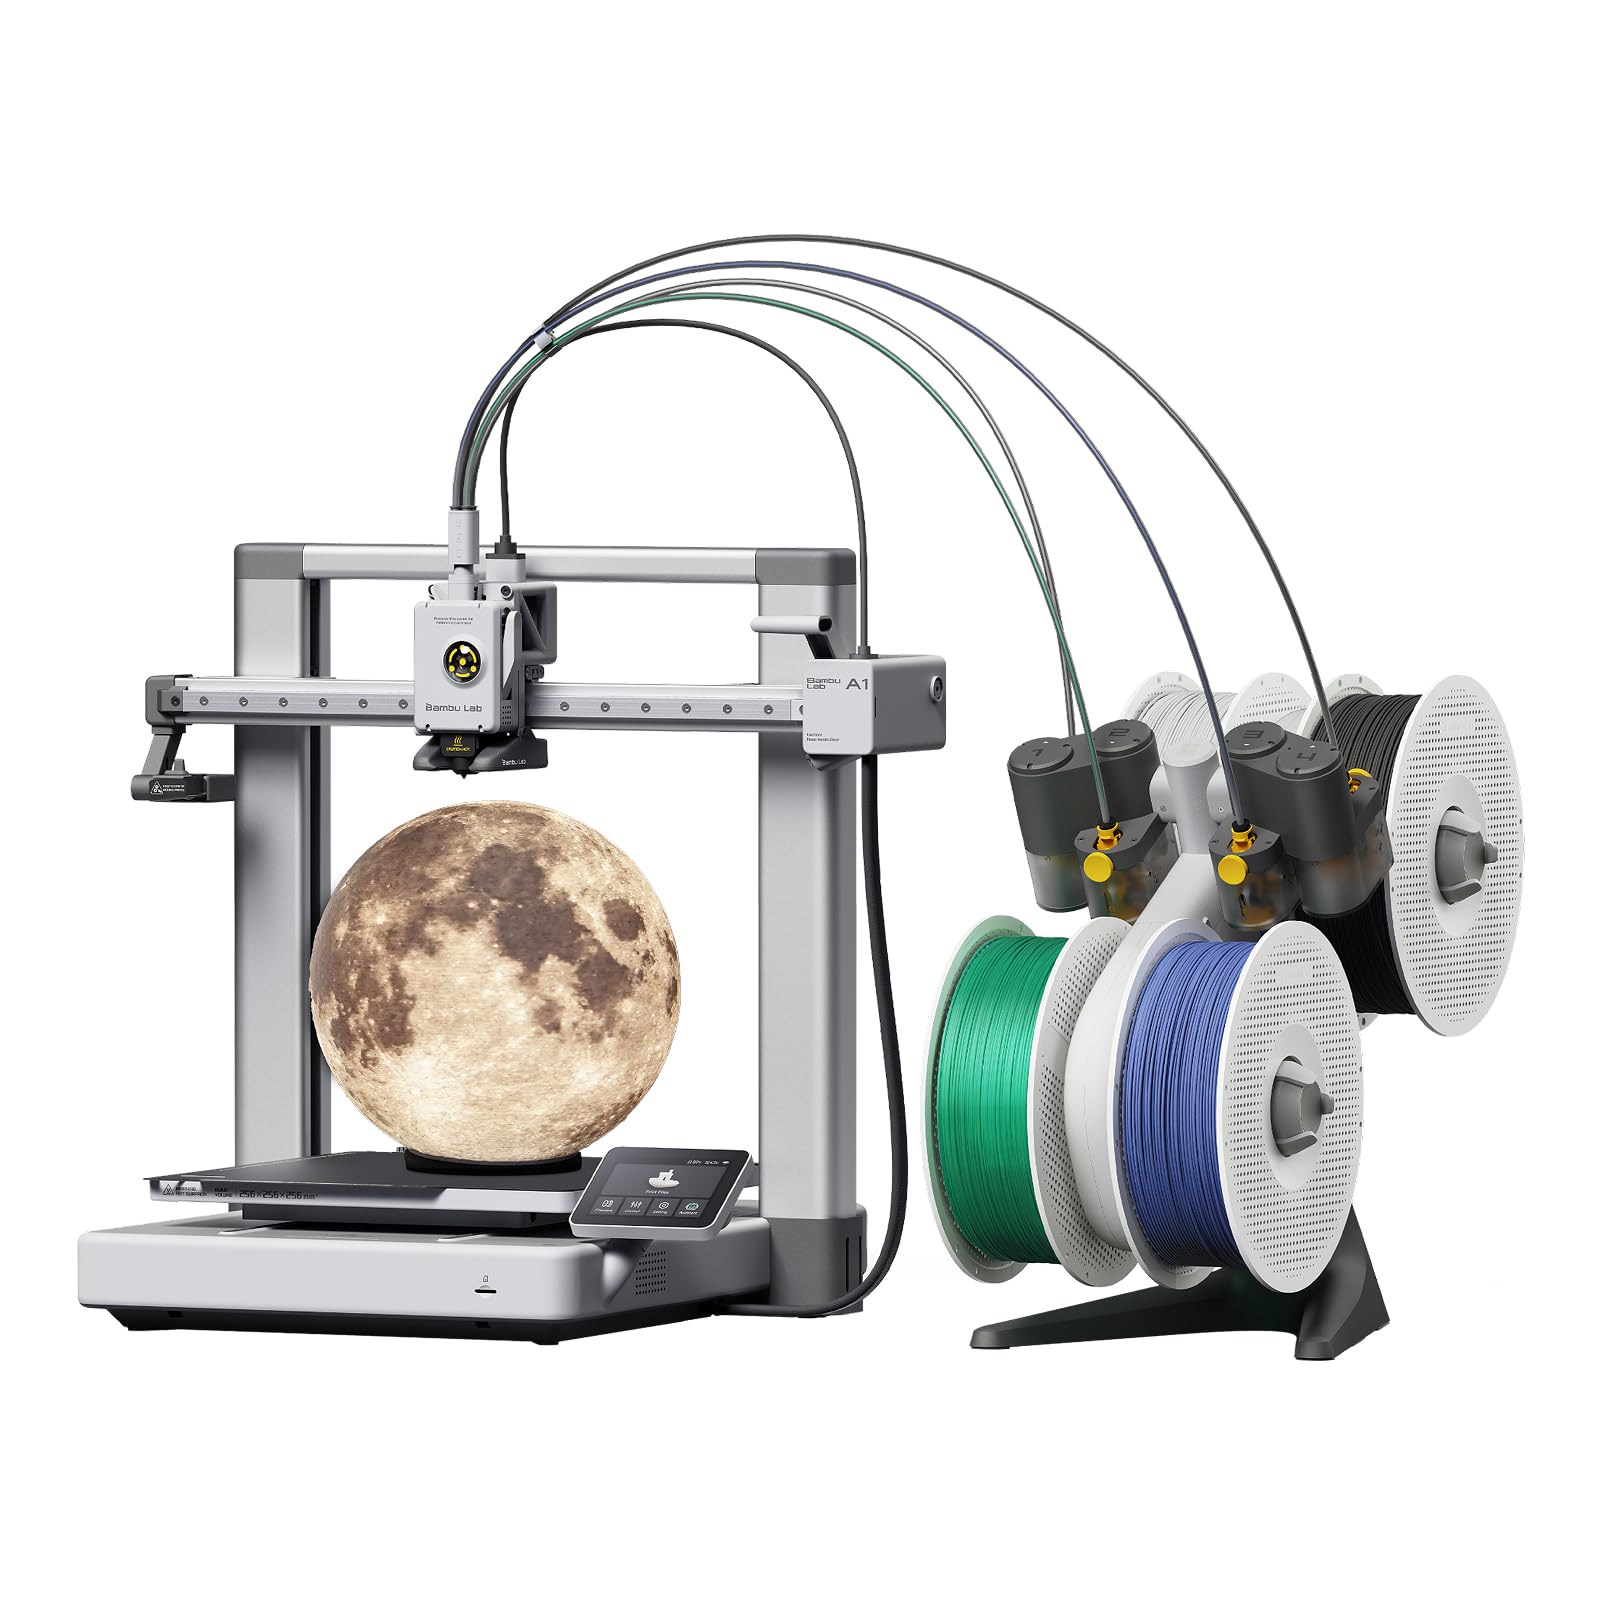
The Bambu Lab A1 Combo is the closest thing to an appliance-grade 3D printer at this price. Its automatic calibration handles Z-offset, bed leveling, and vibration compensation without any manual intervention—you unbox, load filament, and print within minutes. The Active Flow Rate Compensation algorithm reads extrusion width in real-time and adjusts material flow, eliminating under-extrusion ghosting that plagues lesser machines.
The AMS Lite system supports up to four colors or materials in a single print, using a filament switcher that retracts and reloads at the layer change. This opens multi-material prints for supports, soluble PVA, or TPU grips without manual swaps. The included LED Lamp Kit turns any translucent print into a functional light, leveraging the 10,000 mm/s² acceleration to produce clean overhangs even on decorative curves.
At ≤48 dB during operation, this printer is quiet enough to run in a shared workspace or bedroom. The 1-Clip quick-swap nozzle reduces downtime when switching between 0.4 mm and 0.2 mm nozzles for finer detail. While the build volume is smaller than CoreXY competitors, the combination of out-of-box reliability and multi-color capability makes it the strongest entry point for serious beginners.
Why it’s great
- Full-auto calibration with 10,000 mm/s² acceleration
- Multi-color printing via AMS Lite system
- Near-silent operation at ≤48 dB
- Active flow rate compensation for flawless extrusion
Good to know
- Included filament sample is minimal
- Enclosed chamber not available for high-temp materials
- LED lamp kit adds complexity for some builds
2. Bambu Lab P1S

The Bambu Lab P1S bridges the gap between plug-and-play simplicity and professional-grade enclosure. Its steel-frame CoreXY architecture delivers 500 mm/s print speeds with 20,000 mm/s² acceleration while the enclosed chamber maintains stable temperatures for ABS, ASA, and polycarbonate. The auto bed leveling system uses 36-point inductive sensing, and the printer automatically compensates for thermal expansion as the chamber warms up—a detail most budget enclosures ignore.
Filament compatibility spans PLA, PETG, TPU, PVA, PET, ABS, and ASA, with the optional AMS adding up to 16 colors or materials. The fully enclosed design reduces warping on large ABS parts and minimizes fumes, though the machine should still be ventilated. The 256 x 256 x 256 mm build volume is generous for functional prototypes, and the 30-minute setup time from unboxing to first print is among the fastest in its class.
Reliability is the P1S’s strongest asset. The direct-drive extruder handles flexible TPU without jamming, and the hardened steel nozzle resists wear from carbon-fiber filaments (though Bambu officially recommends against them). Users report running hundreds of prints with only routine maintenance. For anyone who needs to print engineering-grade materials without the learning curve of a Voron build, this is the practical choice.
Why it’s great
- Fully enclosed for ABS/ASA printing
- 36-point auto leveling with thermal compensation
- Up to 16 colors via AMS expansion
- Massive community and slicer support
Good to know
- AMS sold separately for multi-color
- Carbon fiber filaments not officially recommended
- Enclosure needs lid venting for PLA
3. ELEGOO Centauri Carbon
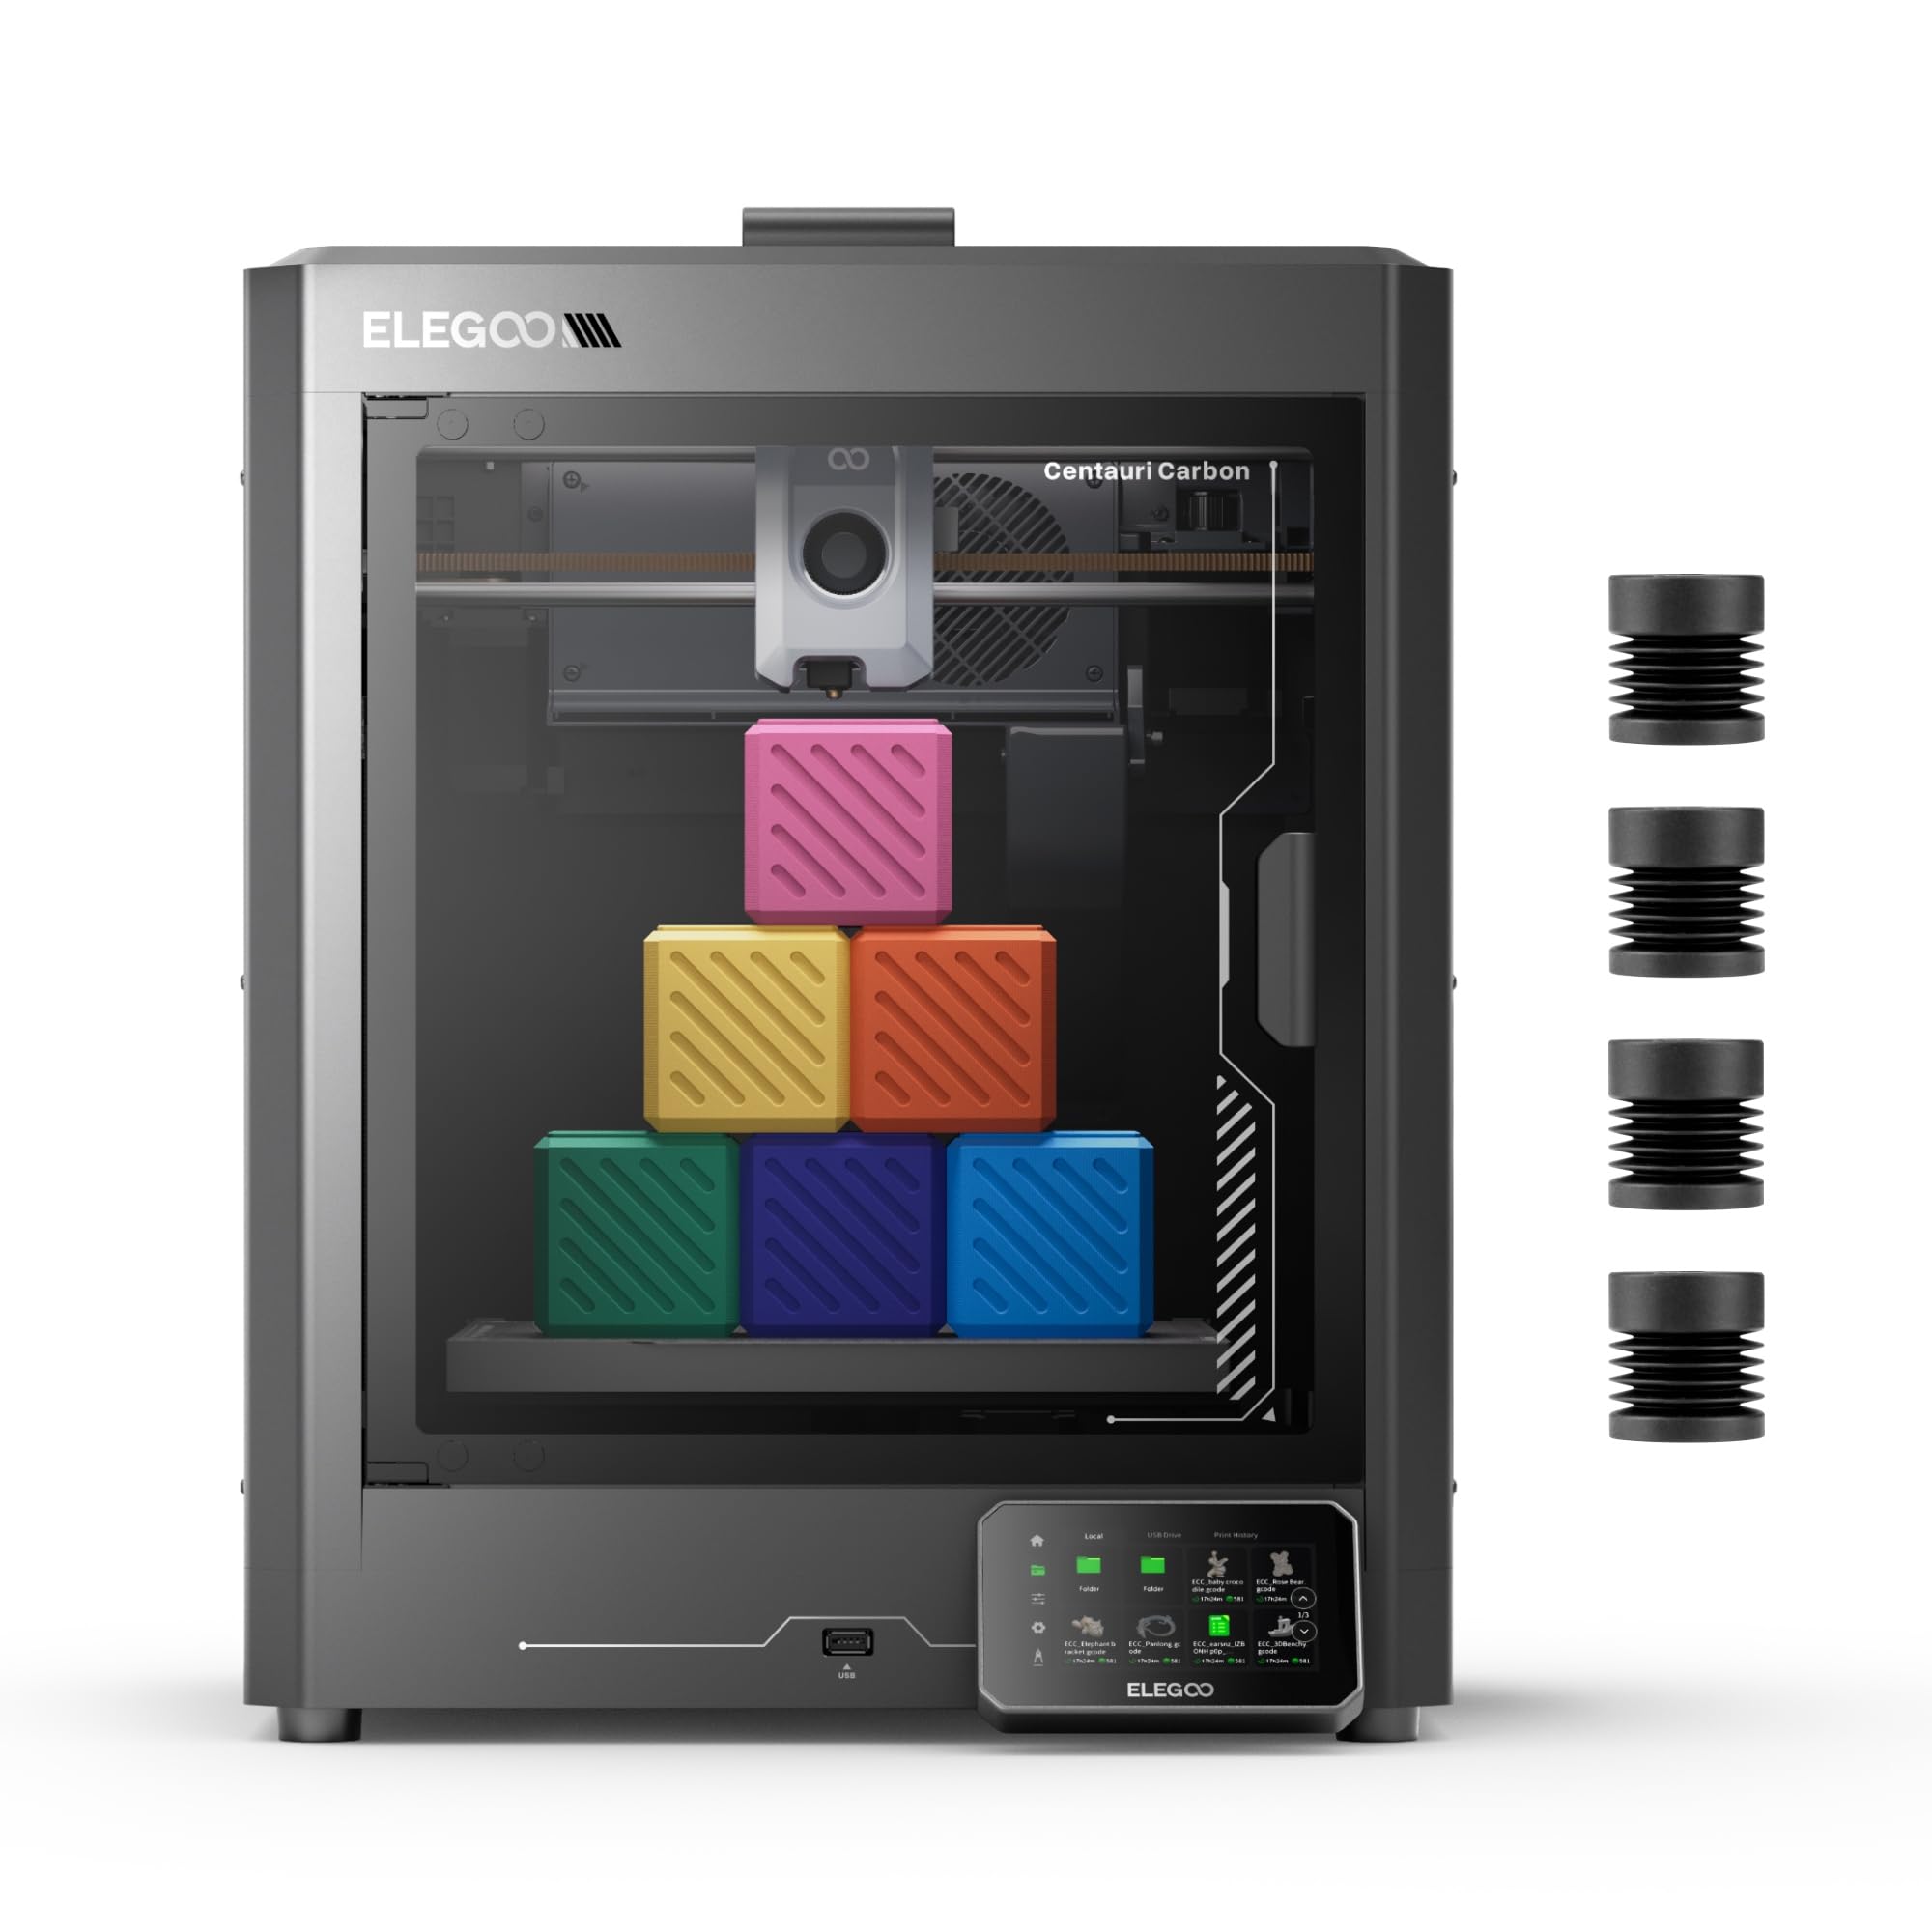
The ELEGOO Centauri Carbon arrives fully assembled and pre-calibrated from the factory, with auto bed leveling and input shaping already tuned. The 320°C brass-hardened steel nozzle and enclosed chamber make it one of the few sub- printers that can print carbon-fiber-reinforced nylon, PA-CF, and PET-CF out of the box. The 256 x 256 x 256 mm build volume is a true cubic foot, giving you the same X, Y, and Z capacity for tall or wide parts.
The CoreXY frame uses a rigid die-cast aluminum base that minimizes vibration artifacts even at 500 mm/s speeds. The dual-sided PEI build plate offers a PLA-specific surface on one side for perfect first-layer adhesion at lower bed temperatures, and a textured PEI side for PETG and TPU. The built-in camera streams time-lapse video to the ElegooSlicer app, and the dual LED lights make remote monitoring viable even in low-light rooms.
Print quality is consistent from the first run. The auto-leveling system measures 16 points and creates a mesh that compensates for minor bed variations. The high-flow hotend delivers a 32 mm³/s volumetric flow, which keeps layer times short even on detailed models. Users report 300-400 hours on PETG and PLA+ with no nozzle degradation. For makers who want to explore advanced materials without upgrading components, this printer delivers disproportionate value.
Why it’s great
- 320°C nozzle for carbon-fiber filaments
- Enclosed chamber, fully assembled
- Built-in camera and time-lapse recording
- Dual-sided PEI plate with PLA-specific surface
Good to know
- USB-C cable design criticized for fragility
- Firmware updates can be lengthy
- Customer support process can be slow
4. Creality K1C

The Creality K1C pushes the speed envelope to 600 mm/s with 20,000 mm/s² acceleration, making it one of the fastest CoreXY printers under . The clog-free direct extruder features a bolster spring and ball plunger that grips filament tightly, reducing skip during high-flow prints. The titanium alloy heatbreak blocks heat creep, allowing the 300°C nozzle to maintain consistent extrusion even on 12-hour ABS prints.
The AI camera is the standout feature at this price point. It recognizes spaghetti failures, layer shifts, and foreign objects on the print bed, then automatically pauses the job and sends an alert to your phone. This saves hours of wasted filament and time, especially for overnight prints. The upgraded cooling stack uses three fans: a hotend fan for heat creep prevention, a part cooling fan for overhang hardening, and an auxiliary side fan that minimizes stringing on bridges.
The 220 x 220 x 250 mm build volume is standard for the category, but the K1C’s speed means you iterate faster. The auto calibration handles Z-offset, bed leveling, and input shaping automatically. Users note that the printer is louder than the Bambu alternatives due to the auxiliary fan, and the AI detection has occasional false positives. For speed-focused makers willing to trade some silence for velocity, the K1C is hard to beat.
Why it’s great
- 600 mm/s print speed with 20,000 mm/s² acceleration
- AI camera detects spaghetti failures and pauses prints
- 300°C high-temp printing for carbon-fiber materials
- Clog-free extruder with titanium alloy heatbreak
Good to know
- Auxiliary fan is noticeably loud during operation
- AI detection has occasional false positives
- Enclosure not fully sealed for ABS fumes
5. Creality Ender 3 V3 KE

The Ender 3 V3 KE inherits the legendary Ender 3 lineage but upgrades every component that frustrated users on the original. The Sprite Direct Extruder with a 60W ceramic heater reaches 300°C and feeds PLA, PETG, ABS, TPU, and ASA without modification. The 500 mm/s speed and 8,000 mm/s² acceleration are enabled by a rigid X-axis carriage with ball-bearing slides—a noticeable improvement over the V-wheels on older models.
The CR Touch auto-leveling sensor measures 16 points on the bed and compensates for warping with a software mesh. The touch UI screen provides real-time model previews, and the dual-part cooling fans reduce stringing on overhangs. The 220 x 220 x 250 mm build volume matches the K1C, but the V3 KE’s open-frame design makes it easier to access the print bed for cleanup and modifications. The 10-minute assembly time is about half of what older Enders required.
Print quality is consistent at 0.1 mm layer height, though ghosting can appear at maximum acceleration. The OrcaSlicer presets are well-tuned, and the active noise compensation reduces ringing. Users who want a moddable platform with a massive aftermarket will appreciate the V3 KE’s compatibility with community upgrades. It’s not as refined as the Bambu machines, but it offers a compelling mix of speed, material range, and mod-friendly architecture.
Why it’s great
- Sprite Direct Extruder with 300°C capability
- CR Touch 16-point auto leveling
- 10-minute assembly, quick start guide
- Huge community and modding ecosystem
Good to know
- Open-frame design, not enclosed for ABS
- Ghosting appears at max acceleration
- Firmware freezes reported by some owners
6. FLASHFORGE Adventurer 5M

The FLASHFORGE Adventurer 5M is designed for the “set it and forget it” crowd. The full-auto leveling system requires no manual Z-offset calibration—you press one button on the 2.8-inch touchscreen, and the printer maps the bed in under a minute. The 600 mm/s speed and 20,000 mm/s² acceleration are driven by a CoreXY mechanism with vibration compensation software that reduces ghosting to near zero.
The quick-detachable nozzle heats to 280°C using a 50W heater that reaches 200°C in 35 seconds. The dual-sided PEI coating plate provides excellent adhesion for PLA and PETG without glue or tape. The 220 x 220 x 220 mm build volume is a true cube, and the open-frame design allows easy access. The filament run-out sensor pauses the print automatically, and power-loss recovery resumes from the exact layer where the interruption occurred.
Print quality is excellent for the price range. The 32 mm³/s volumetric flow ensures consistent extrusion even at high speeds, and the dual fans cool parts effectively. Users report over 40 prints in six months without issues. The main limitation is the lack of an enclosure for ABS printing, but for PLA and PETG, the Adventurer 5M delivers a frustration-free experience that rivals higher-priced machines. The included Orca Slicer presets are well-optimized out of the box.
Why it’s great
- One-click full-auto bed leveling
- 600 mm/s speed with vibration compensation
- 35-second nozzle heat-up time
- Reliable dual-sided PEI build plate
Good to know
- Open frame, no enclosure for ABS
- Touchscreen sensitivity can be inconsistent
- Wi-Fi connectivity may drop on 5 GHz networks
7. Entina Tina2C
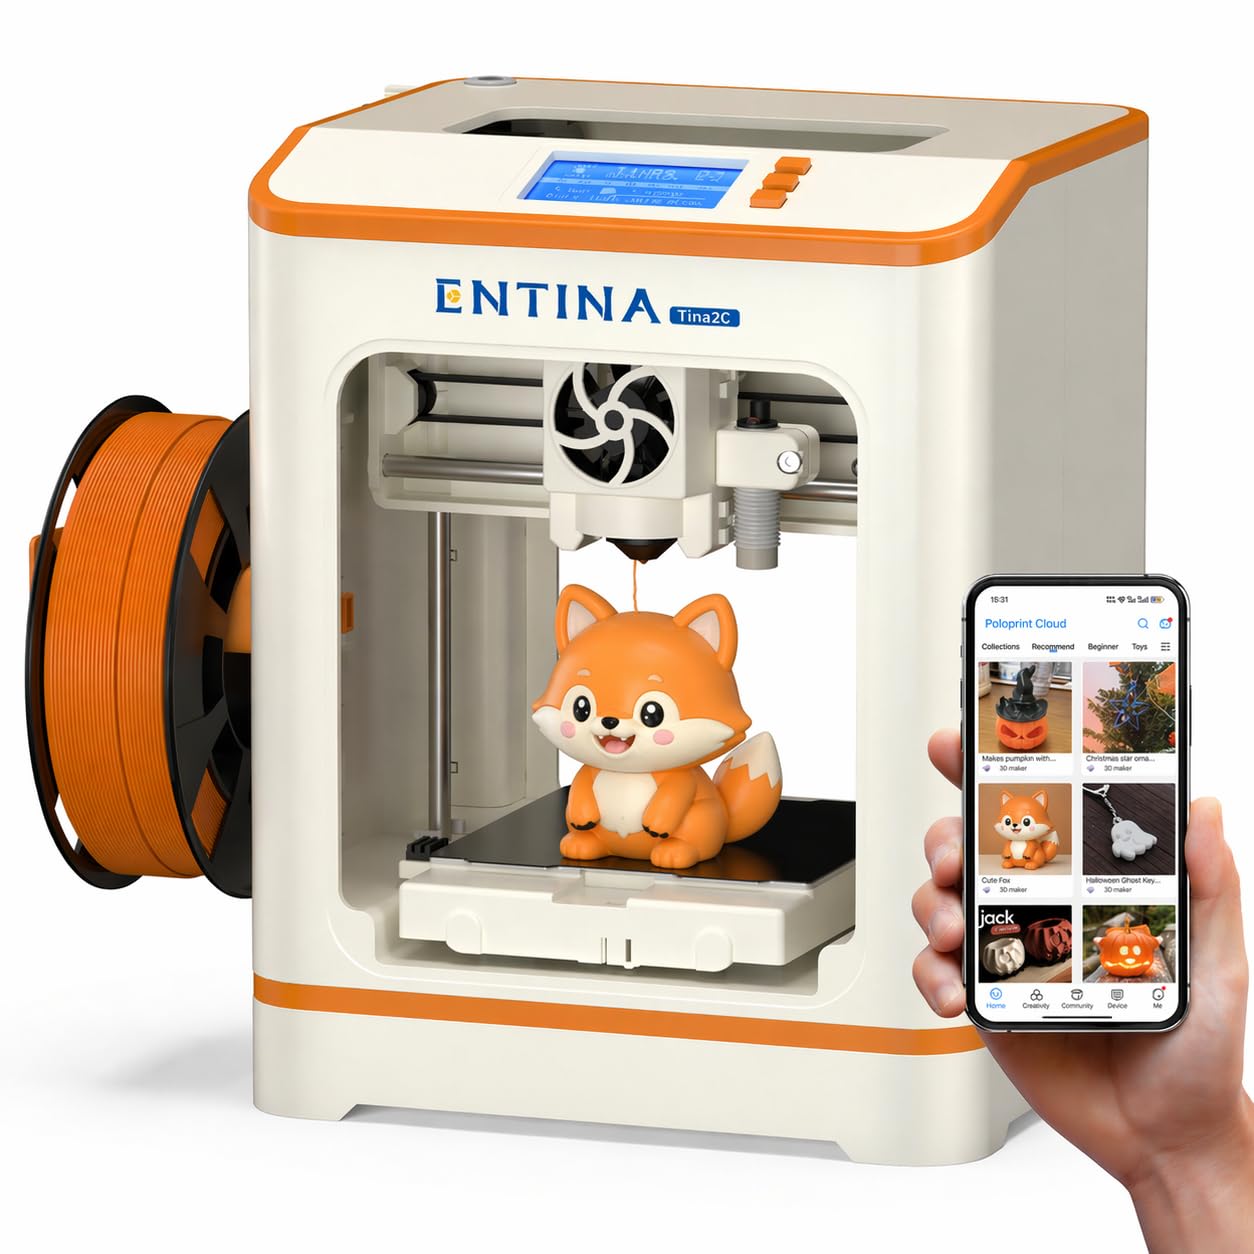
The Entina Tina2C is the most accessible 3D printer for children and classroom environments. Its 100 x 105 x 100 mm build volume is small, which reduces waste and print times, making it ideal for educational projects. The Poloprint Cloud app offers AI-powered search and a photo-to-print feature where kids can turn a smartphone picture into a 3D model within minutes.
Auto leveling is fully automatic—no paper, no manual knobs. The magnetic build plate flexes to release small parts like keychains and figurines. The guided setup walks through Wi-Fi connection to the 2.4 GHz network, and the TF card slot offers offline printing as a fallback. The self-cleaning nozzle design reduces clogs, a common issue with novice users who might forget to preheat before loading filament.
The noise level is low enough for a classroom or bedroom, and the rounded edges eliminate sharp corners. The STEM-focused app includes 20+ creative modules and regularly updated learning courses. While the build volume restricts larger prints, the trade-off is a drastically simplified experience that yields high-success rates for first-time users. For families or educators wanting a dedicated introductory machine, the Tina2C is the best fit.
Why it’s great
- Guided app setup, prints in 8 minutes
- Photo-to-print and AI search features
- Self-cleaning nozzle reduces maintenance
- Safe for kids with rounded edges and low noise
Good to know
- Small 100 mm cuboid build volume
- Only 2.4 GHz Wi-Fi supported
- Limited upgrade path for advanced users
8. ANYCUBIC Photon Mono 4

The ANYCUBIC Photon Mono 4 brings 10K resolution to the resin printing category at a price that undercuts most competitors. The 7-inch monochrome LCD delivers 9024 x 5120 pixels, yielding XY pixel dimensions of 17 x 17 microns—this means individual layers are virtually invisible to the naked eye. The LighTurbo matrix light source provides uniform UV distribution that eliminates layer lines and rasterization artifacts common in lower-resolution resin printers.
The build volume measures 153.4 x 87 x 165 mm, enough for detailed miniatures, jewelry molds, and dental models. Single-layer exposure times of just 1.5 seconds speed up prints significantly compared to older 2-3 second standard. The re-engineered build platform uses laser-engraved patterns that provide consistent adhesion during printing but release parts smoothly after the print cycle. Power-loss recovery prevents wasted resin during outages.
The key consideration for beginners is that resin printing involves post-processing: washing, curing, and handling liquid resin, which requires gloves, ventilation, and a wash station. The smell is noticeable even with low-odor resins. The Photon Mono 4 itself is reliable mechanically, but the LCD screen is a consumable—users report replacement costs of around . For those who need high-detail parts and are willing to accept the extra workflow, the print quality per dollar is unmatched.
Why it’s great
- 10K resolution with 17×17 micron pixel size
- 1.5-second per layer exposure for fast resin prints
- Uniform LighTurbo matrix light source
- Laser-engraved platform for stable adhesion
Good to know
- Resin printing requires gloves and ventilation
- LCD screen is a consumable, approx. replacement
- Smaller build volume compared to FDM printers
9. Entina Tina2 Basic

The Entina Tina2 Basic strips away unnecessary complexity to deliver a genuinely plug-and-play experience at the lowest entry price. Fully assembled out of the box, the only setup steps are loading filament through the one-button system and inserting the MicroSD card that contains test models and Wiibuilder slicer software. The 100 x 105 x 100 mm build volume is tiny but perfectly sized for keychains, figurines, and educational samples.
The dual Z-axis rails are a surprising inclusion at this price point. They stabilize the print head and reduce wobble during high-speed moves, improving print quality on small details. The magnetic build platform allows parts to pop off with a simple flex, eliminating the need for spatulas or scrapers. The auto-leveling system is genuinely automatic—no manual leveling knobs, no paper shims.
Print quality is respectable for the size, with good layer adhesion on the supplied PLA. The 2.4-inch LCD screen with knob navigation is straightforward, and the offline printing via MicroSD means no network dependency. The fan noise is moderate, and multiple users report their children printing successfully within minutes of unboxing. The trade-off is a non-upgradeable platform and the small build volume, but for absolute beginners on a tight budget, the Tina2 Basic delivers reliable results with almost zero friction.
Why it’s great
- Fully assembled, prints in 5 minutes
- Dual Z-axis rails for stable prints
- Automatic bed leveling, no manual calibration
- Magnetic build plate for easy part removal
Good to know
- 100 mm build volume limits project size
- Non-upgradeable platform
- SD card workflow, no direct app control
FAQ
How often do I need to level the bed on a basic 3D printer?
What is the difference between FDM and resin printers for beginners?
Final Thoughts: The Verdict
For most users, the basic 3d printer winner is the Bambu Lab A1 Combo because its full-auto calibration, multi-color AMS Lite system, and quiet operation remove every traditional barrier to entry while still delivering professional-quality prints. If you need an enclosed chamber for ABS or engineering materials, grab the Bambu Lab P1S. And for a strictly budget-friendly introduction that prints reliably out of the box, nothing beats the Entina Tina2 Basic.