Taking screenshots on your Sony laptop is easy and convenient. You can use keyboard shortcuts, Snipping Tool, or a Snip and Skecth window built-in software to capture any screen you want.
In this article, I will show you how to use these methods and their advantages. Let’s get started!
Method 1) Take Screenshot on Sony Laptop Using Keyboard Shortcuts
The first method we will be using for taking screenshots on Sony will be keyboard shortcuts. There is some keyboard combination from which you can easily capture your Sony screen and can save it.
Below are all the possible keyboard shortcuts for taking screenshots on a Sony Vaio laptop.
Keyboard shortcut For Full-Screen Screenshot on Sony Laptop
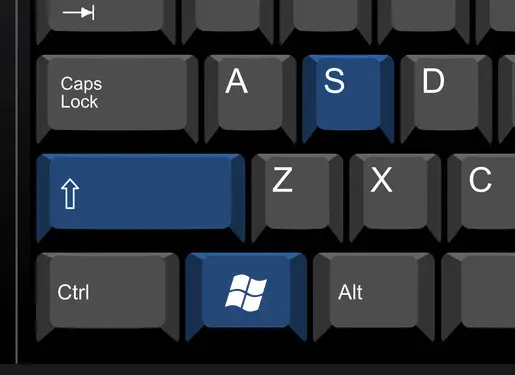
This method will only work on Windows 10. If you are using Windows 10 you can follow the steps below for taking your entire screen shortcuts in no time using the Windows key + Shift + S.
- Open the window you want to screenshot
- Press the windows Key+Shift +S
- Once done, the screenshot will be automatically copied to snip and sketch software, where you can also edit it.
- Save it using the Ctrl + S keyboard Shortcut
Take Screenshot in Sony Laptop Using Print Screen Key

There is also a unique key on every laptop for screenshots labeled as Prin Sc or Print Scr. Using this key, you can easily screenshots on your Sony laptop. Still, the only limitation of using this method is that you will have to first paste the screenshot on Paint or any image editing software, and then you can save it on your laptop.
Below are the steps on how to screenshot on Sony using the print screen key
- Open the tab you want to screenshot
- Press print screen key (Print Sc, Print Scr)
- Open Paint or any other image editing software
- Once open, press Ctrl + V to paste the screenshot
- Now save it using the Ctrl + S
You can automatically save the screenshot on your Sony Vaio laptop by using the other keyboard shortcut for fullscreen. See the following method.
Take Screenshot in Lenovo Using Window key + Print Screen For Entire Screen

If you want screenshots to save on your laptop automatically, you have to paste or save them. Then you can use the Windows key + Print Screen key as this will automatically store your screenshot to C:\Users\[YOUR NAME]\Pictures\Screenshots.
Take Screenshots on Sony Laptop Using a Print Screen For Active Window
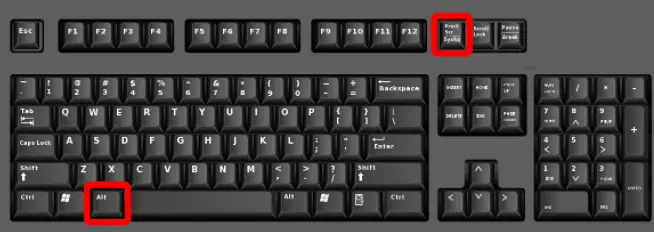
Don’t worry if you are a multitasker and have many windows open but want to screenshots the active window only. You can do that by press the Alt + Print Screen key. The screenshot will be taken from the active window.
Now open Paint or any other image edition software and Press Ctrl + V to paste the screenshot there and save it using the Ctrl + S keyboard shortcut.
Method 2)Take Screenshot On Sony Using Snip & Sketch
Using a built-in snip and sketch software from Windows, you can easily take screenshots on your Sony Vaio.
The benefit of using this method is that you can also edit and annotate the screenshots with different options available in snip and Sketch.
Below is the step-by-step way to take a screenshot on a Sony laptop using the Snip and sketch tool.
- Open the snip and sketch by typing snip in the windows search box
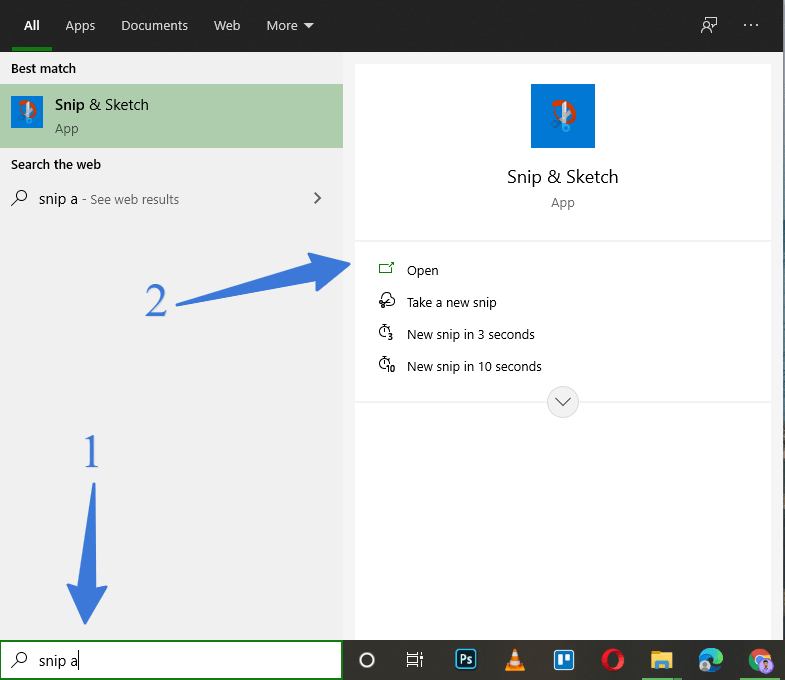
- Open the snip and sketch and Click on New
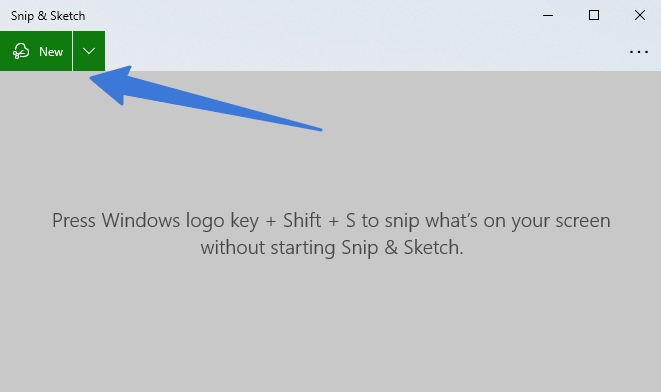
- Select the screenshot type you need among many

- Once done, edit the screenshot using different editing tools
- Save it using the Ctrl + S
Method 3) Take a Screenshot on Lenovo using the Snipping tool
Windows 10 also has one other utility named the snipping tool for taking screenshots on your laptop. Although it might not be available in the future as Windows is replacing it with snip and Sketch, it is still available in Windows 10 and 11.
Below are the steps mentioned on how to screenshot on Sony using the snipping tool.
- Type the snipping tool in Windows Search and open it
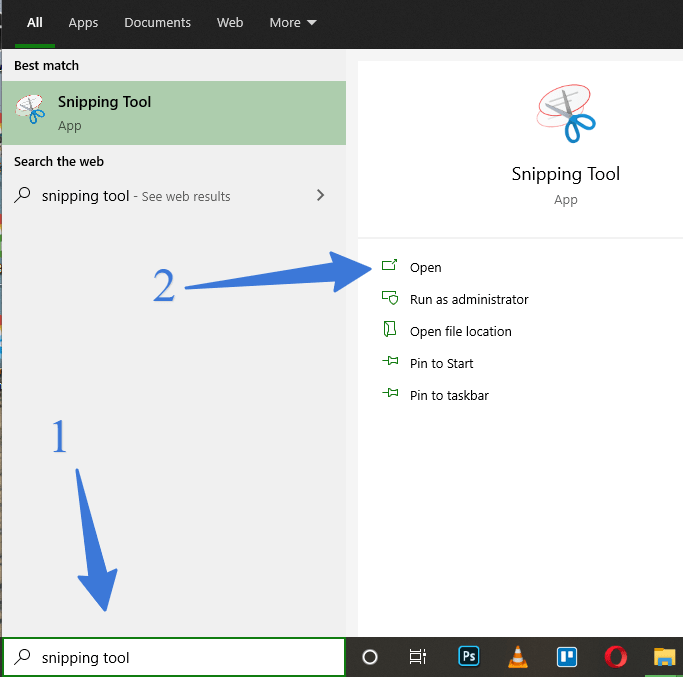
- Click on new on the top bar
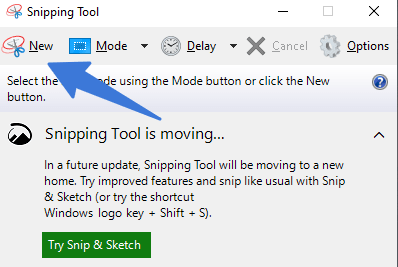
- Take a screenshot of the area you want
- Use Ctrl + S to save it
FAQ (How To Screenshot On Sony Laptop)
How to Screenshot on a Sony Vaio laptop?
Sony Vaio provides an easy way to screenshot. Press the window key + Print Screen key on your keyboard, and it will take a screenshot and save it to C:\Users\[YOUR NAME]\Pictures\Screenshots.
Where Are the Screenshots Saved on the Sony Vaio Laptop?
The screenshot is saved in C:\Users\[YOUR NAME]\Pictures\ on any laptop using Windows 10 unless you didn’t change the path of the screenshot folder.
Conclusion
After reading this article on How To Screenshot On Sony Laptop, hopefully, you will be able to screenshot on your Sony Vaio laptop. As I share many methods with you, pick the easy one that you can easily remember and use.
You May Like :
How To Screenshot On Samsung Laptop
How To Screenshot On Lenovo Laptop
How to Screenshot On Acer Laptop

Hi, I’m Michael Davis, the owner and writer of GadgetsFeed.com. This website is where I share my knowledge and passion for tech, laptops, and computers. I’m a software engineer by profession, and I enjoy testing and reviewing various gadgets and technologies. I started GadgetsFeed.com to help others find easy solutions for their laptop, computer, and tech problems.
